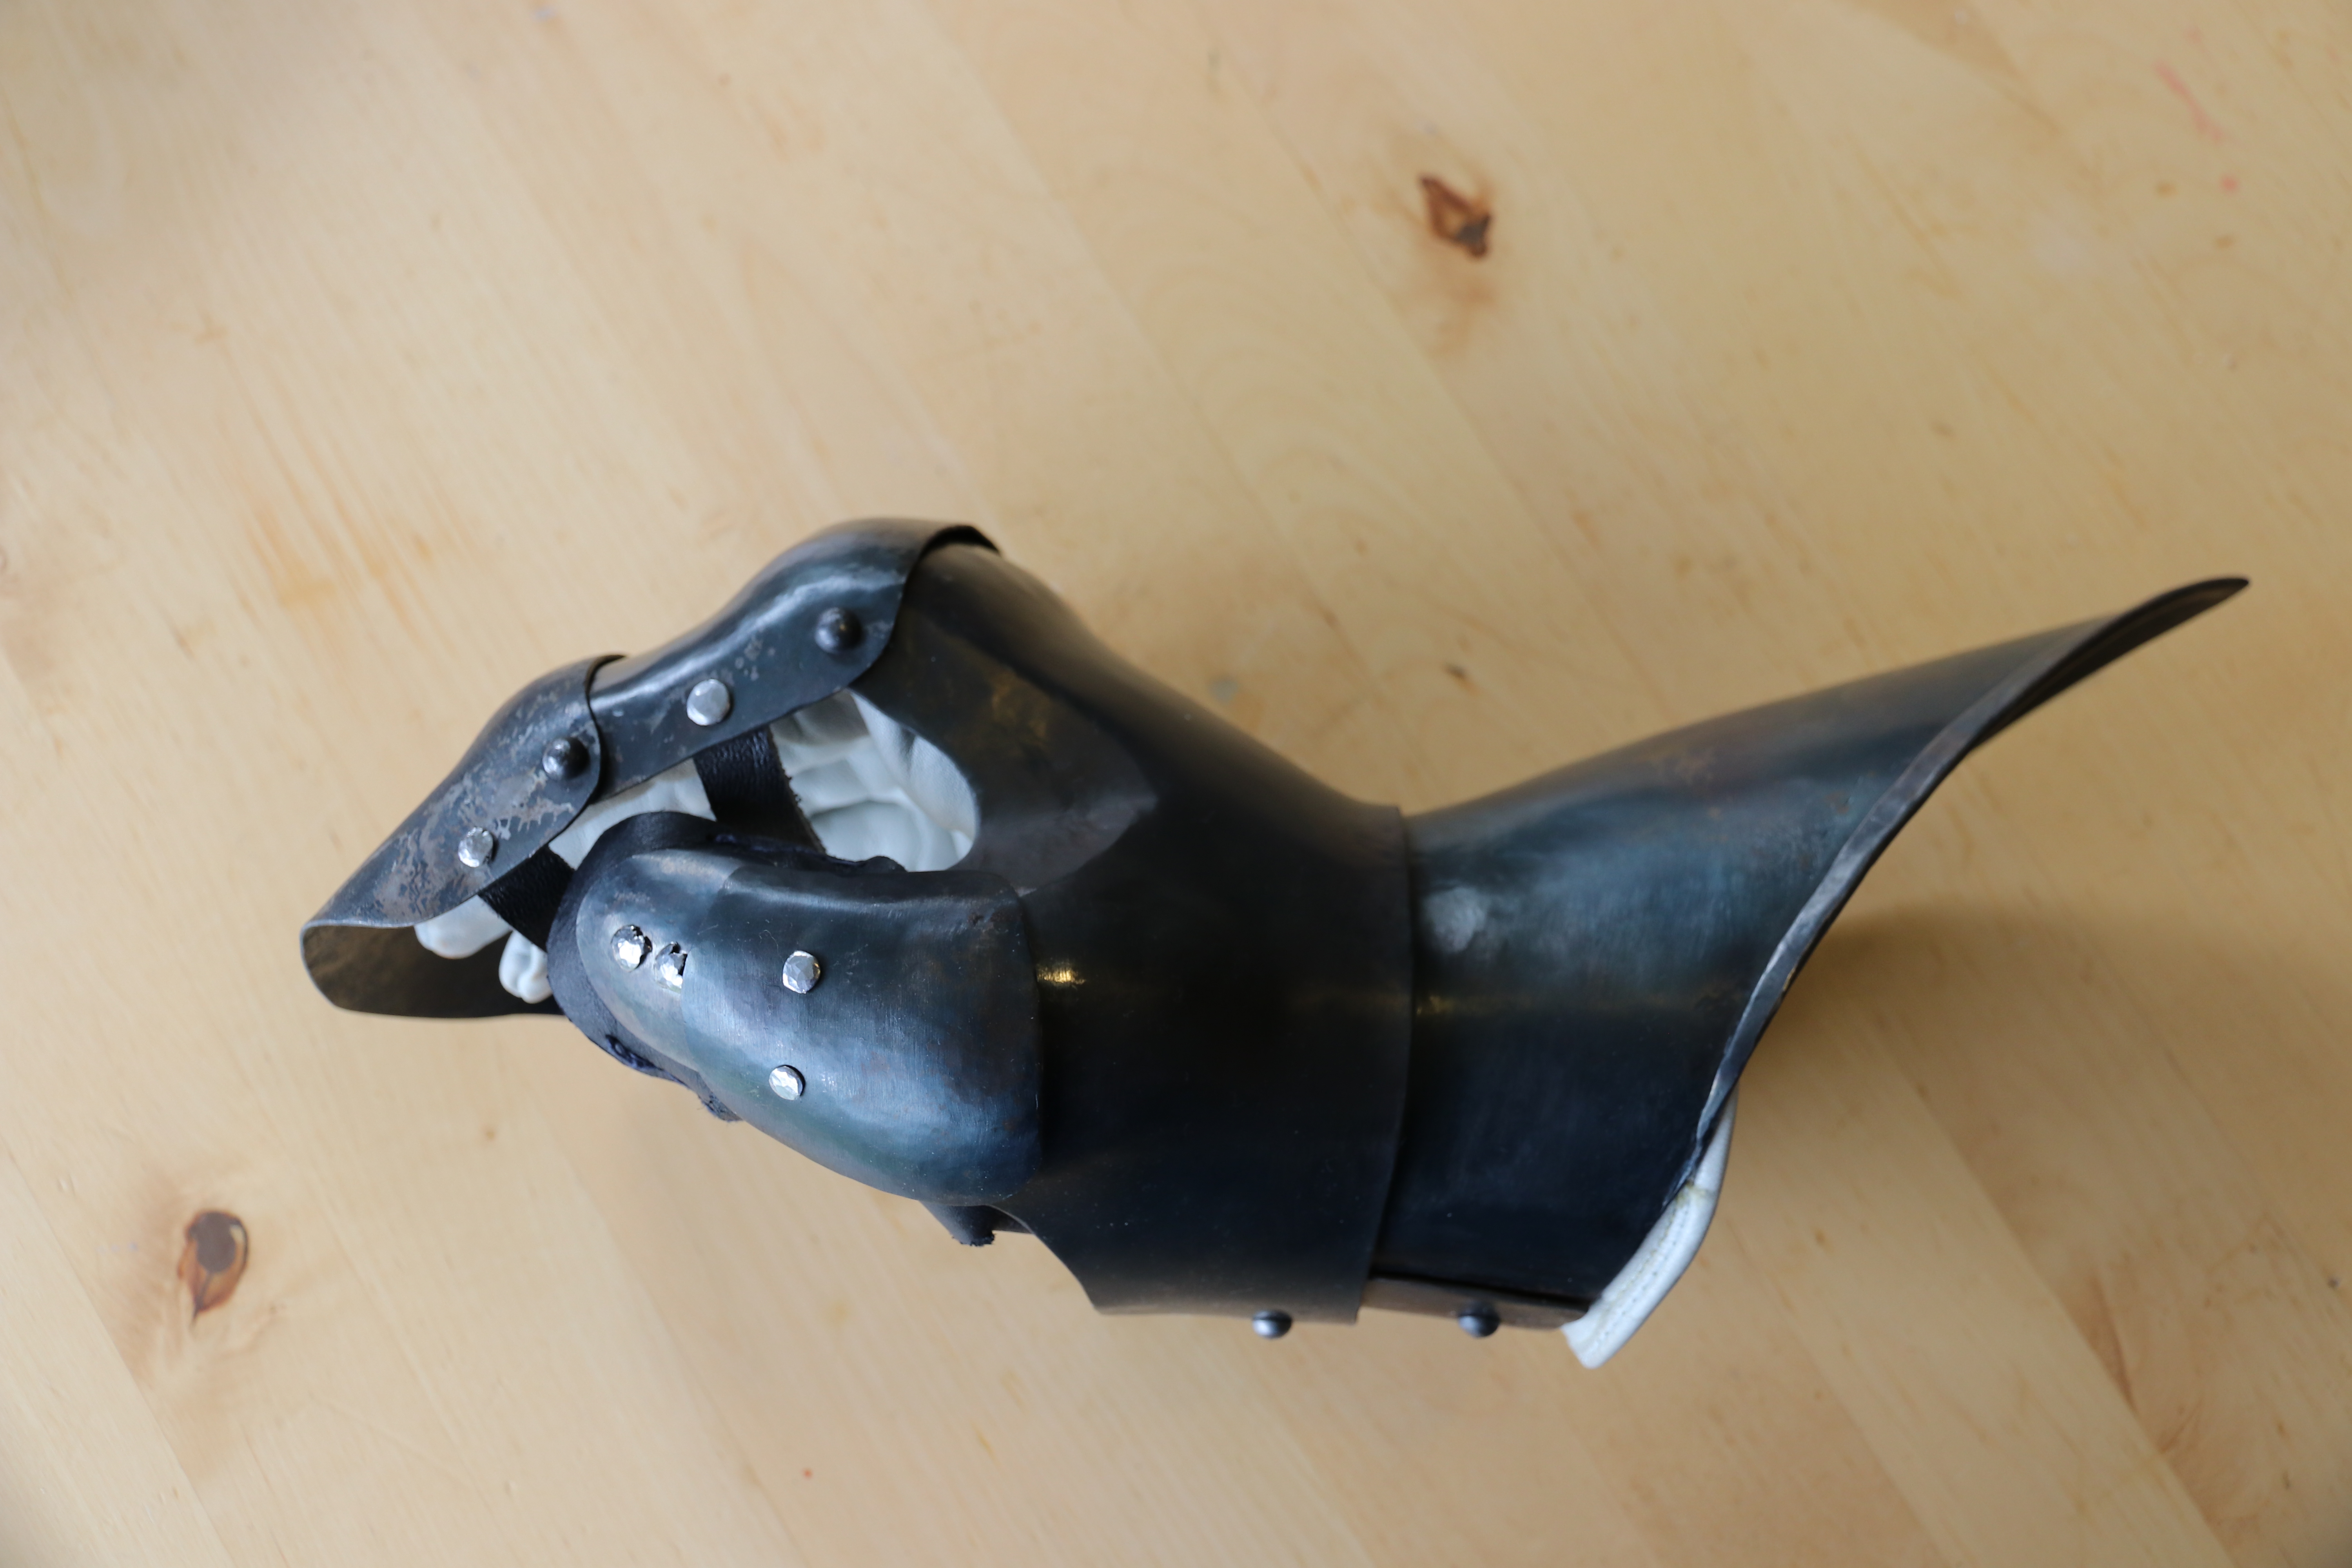
A reproduction of a Churburg arm harness. Helped along by the friendly armouring groups on facebook.


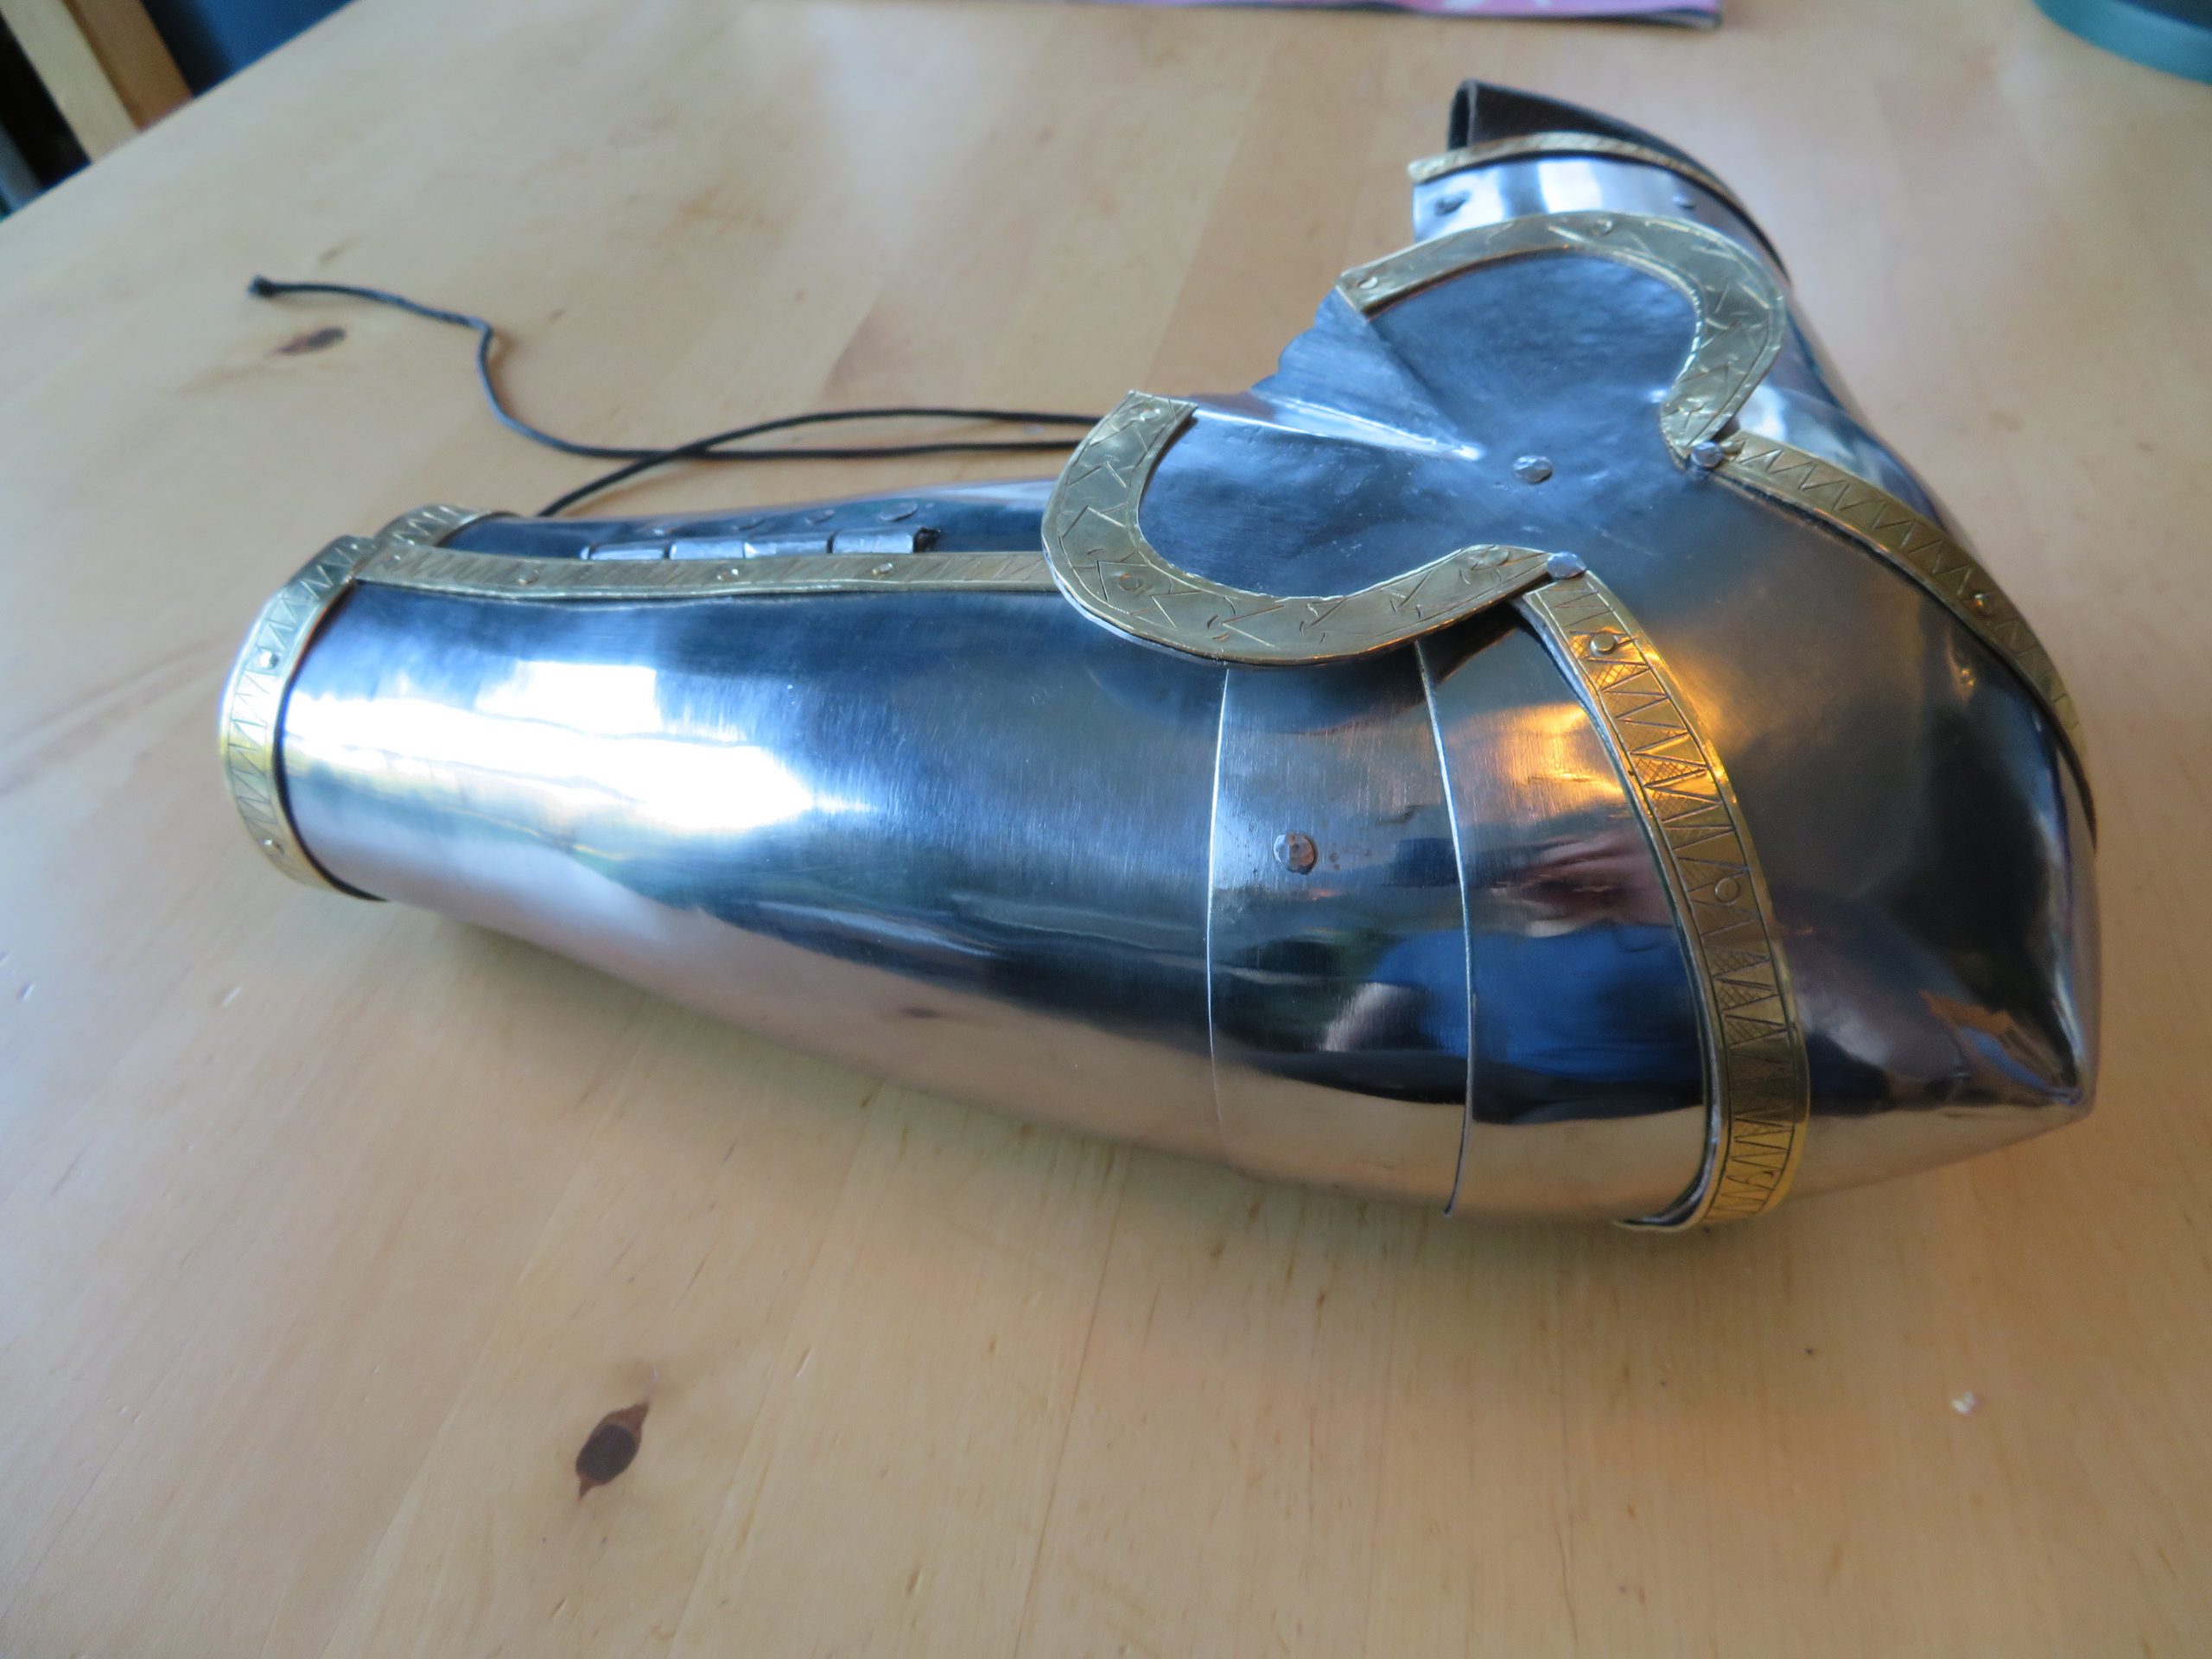
A reproduction of a Churburg arm harness. Helped along by the friendly armouring groups on facebook.


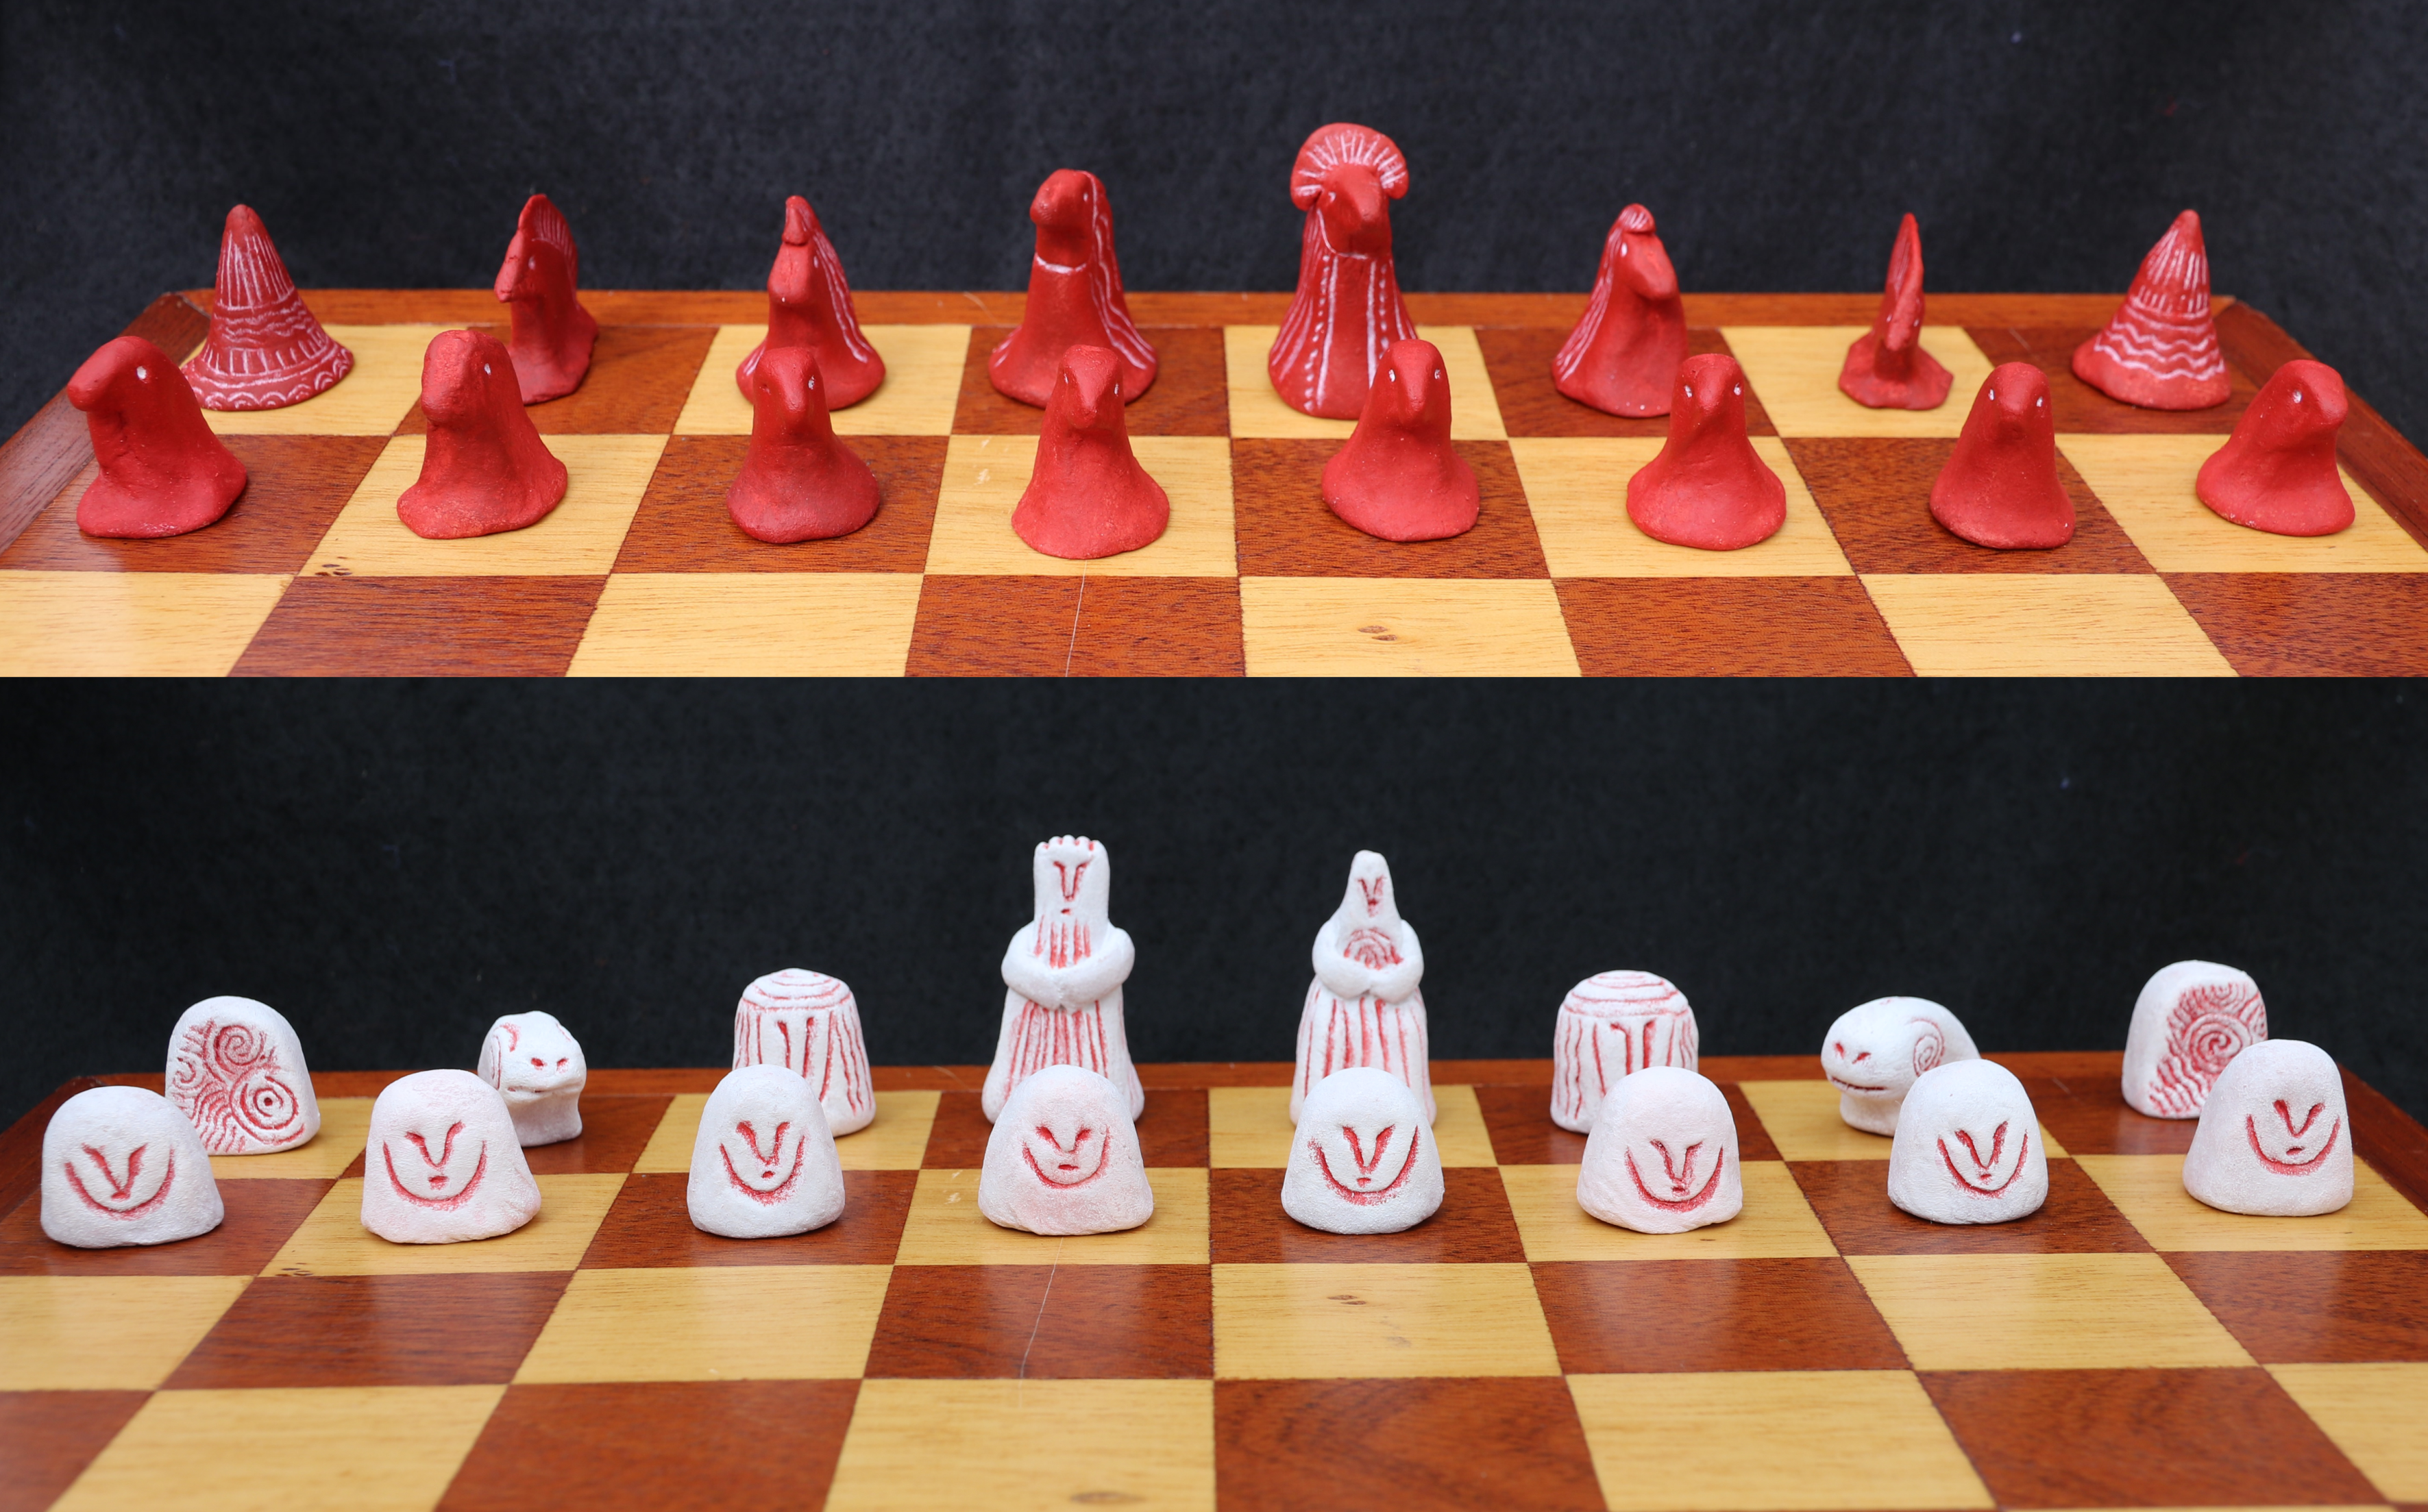
Seeing some neolithic figurines I thought they would make good chess pieces. So I made them.
While I decided to have the pieces on each side be different shapes as well as colours I aimed to have them both built on the same principles, with influence from standard chess pieces, to try and keep it easy to see which piece was which. I don’t seem to have been successful as most people I showed them to haven’t correctly identified the pieces.
The pawns for each side where intended to be the basic design motif for each side, with the other pieces being variations on that idea. The pawns where also smaller, and simpler than the rest of the pieces. The bishops where then larger and more elaborate versions of the pawns shape and the king and queen going another step up each. The knights where supposed to be identifiable as having more animalistic features, recalling the horse of the standard chess set. Finally the castle was made to be inanimate.
I sculpted the chess pieces with Daz, which is an air drying clay, and painted them with acrylics. I started by painting each peice in multiple coats of very wet paint in their main colour. I then, after letting them dry, went over all the groves with wet paint in the second colour (getting quite a lot of paint outside of the grooves as well. Finally I dry brushed over the surface in the main colour, which covered up the paint that had escaped the grooves.
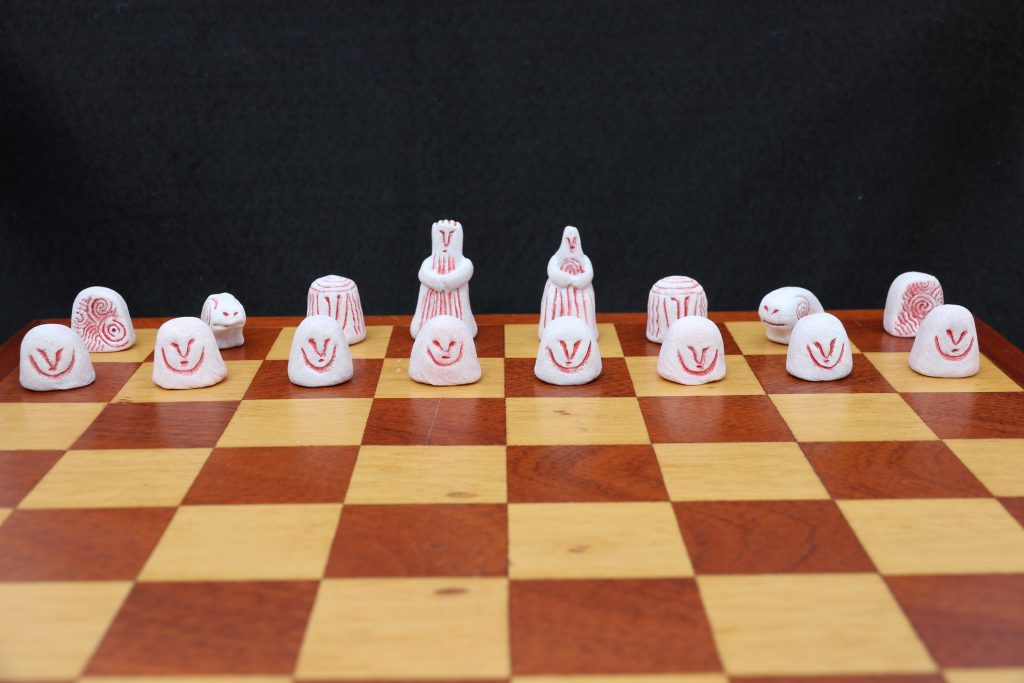
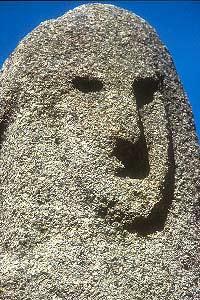
The white pawns were based on the standing stones (menhirs) with faces at Filitosa, dating to 1500 BC. The shape of these pieces has earned the white side the name of stone men or, less generously, potato men.
The white castles where based on stones with cup and ring marks, which are common across prehistoric Europe.
The white knights are based on neolithic ram figurines. I added a mouth and eyes, which end up giving them a rather wonderful Muppet like expression.
The bishops are simply a larger version of the pawns with more details. For some reason people often interpret them as knights, thinking they look like an actual human knight.
The king and queen take some inspiration from a set of bronze age figurines with wide dress like bases. The differences between the king and queen are quite minimal, with the king being slightly larger and having a bigger head with markings indicating a crown. However, despite this, people have had no difficulty distinguishing them.
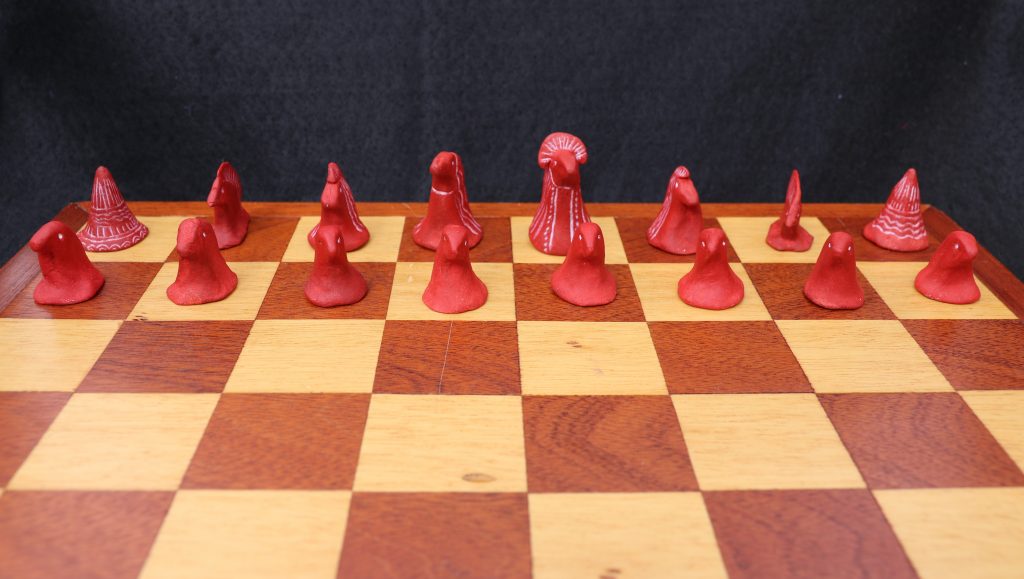
From this view one of the problems with the red set is quite obvious – they look quite similar from head on, which makes them a bit harder to play against.
The red pawns are based on a set of figurines from the Vinča culture, which provided the initial inspiration for this project. Their hunched animalistic shape has earned them the nickname of mole men among my family.
The red castles have no direct inspiration from any artifact. They are just my idea of an inanimate form that fits within the red pieces general aesthetic.
I am well aware that they look like traffic cones.
The problem I encountered with the red knights was that all the red pieces already looked rather like chess knights.I tried to give them a sleeker shape and a large mane to evoke the horse idea but this seemingly did not work as people on first inspection generally think the bishops are the knights.
The ‘mane’ has also been misinterpreted leading them to be called the hedgehogs.
The red bishops are simply enlarged versions of the pawns with more decorations. I gave them a crest with a cut into the front to mirror the slit in the head of the bishop in the standard chess set.
One again the king and queen are larger versions of the same form as the pawns,with the king being distinguished by a large transverse crest like crown.
I really like how these turned out. My favourite pieces are probably the red king and the white castles and knights. The unfortunate thing is that I neither like nor am good at chess.
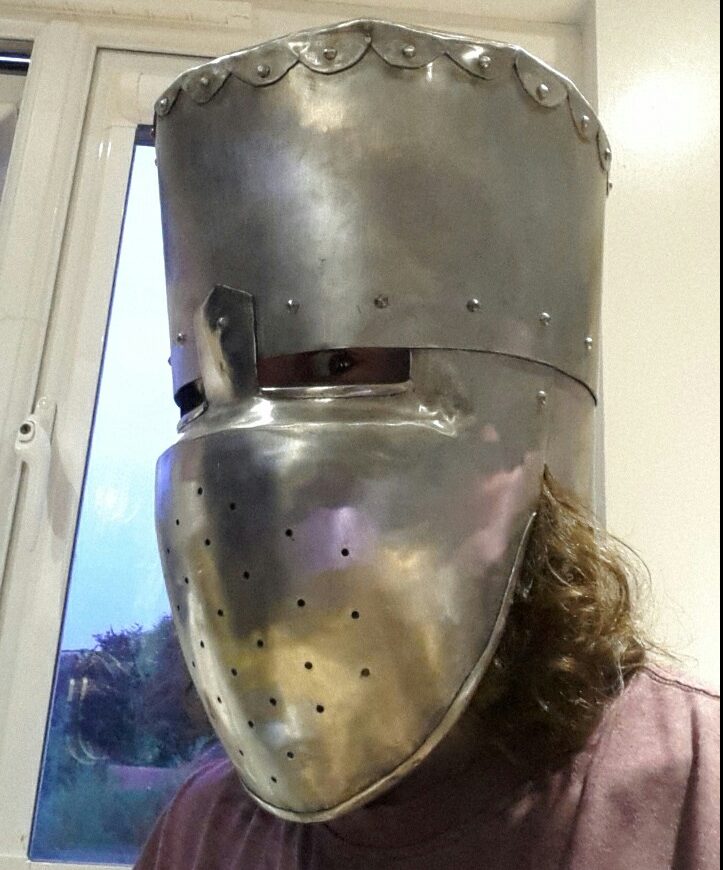
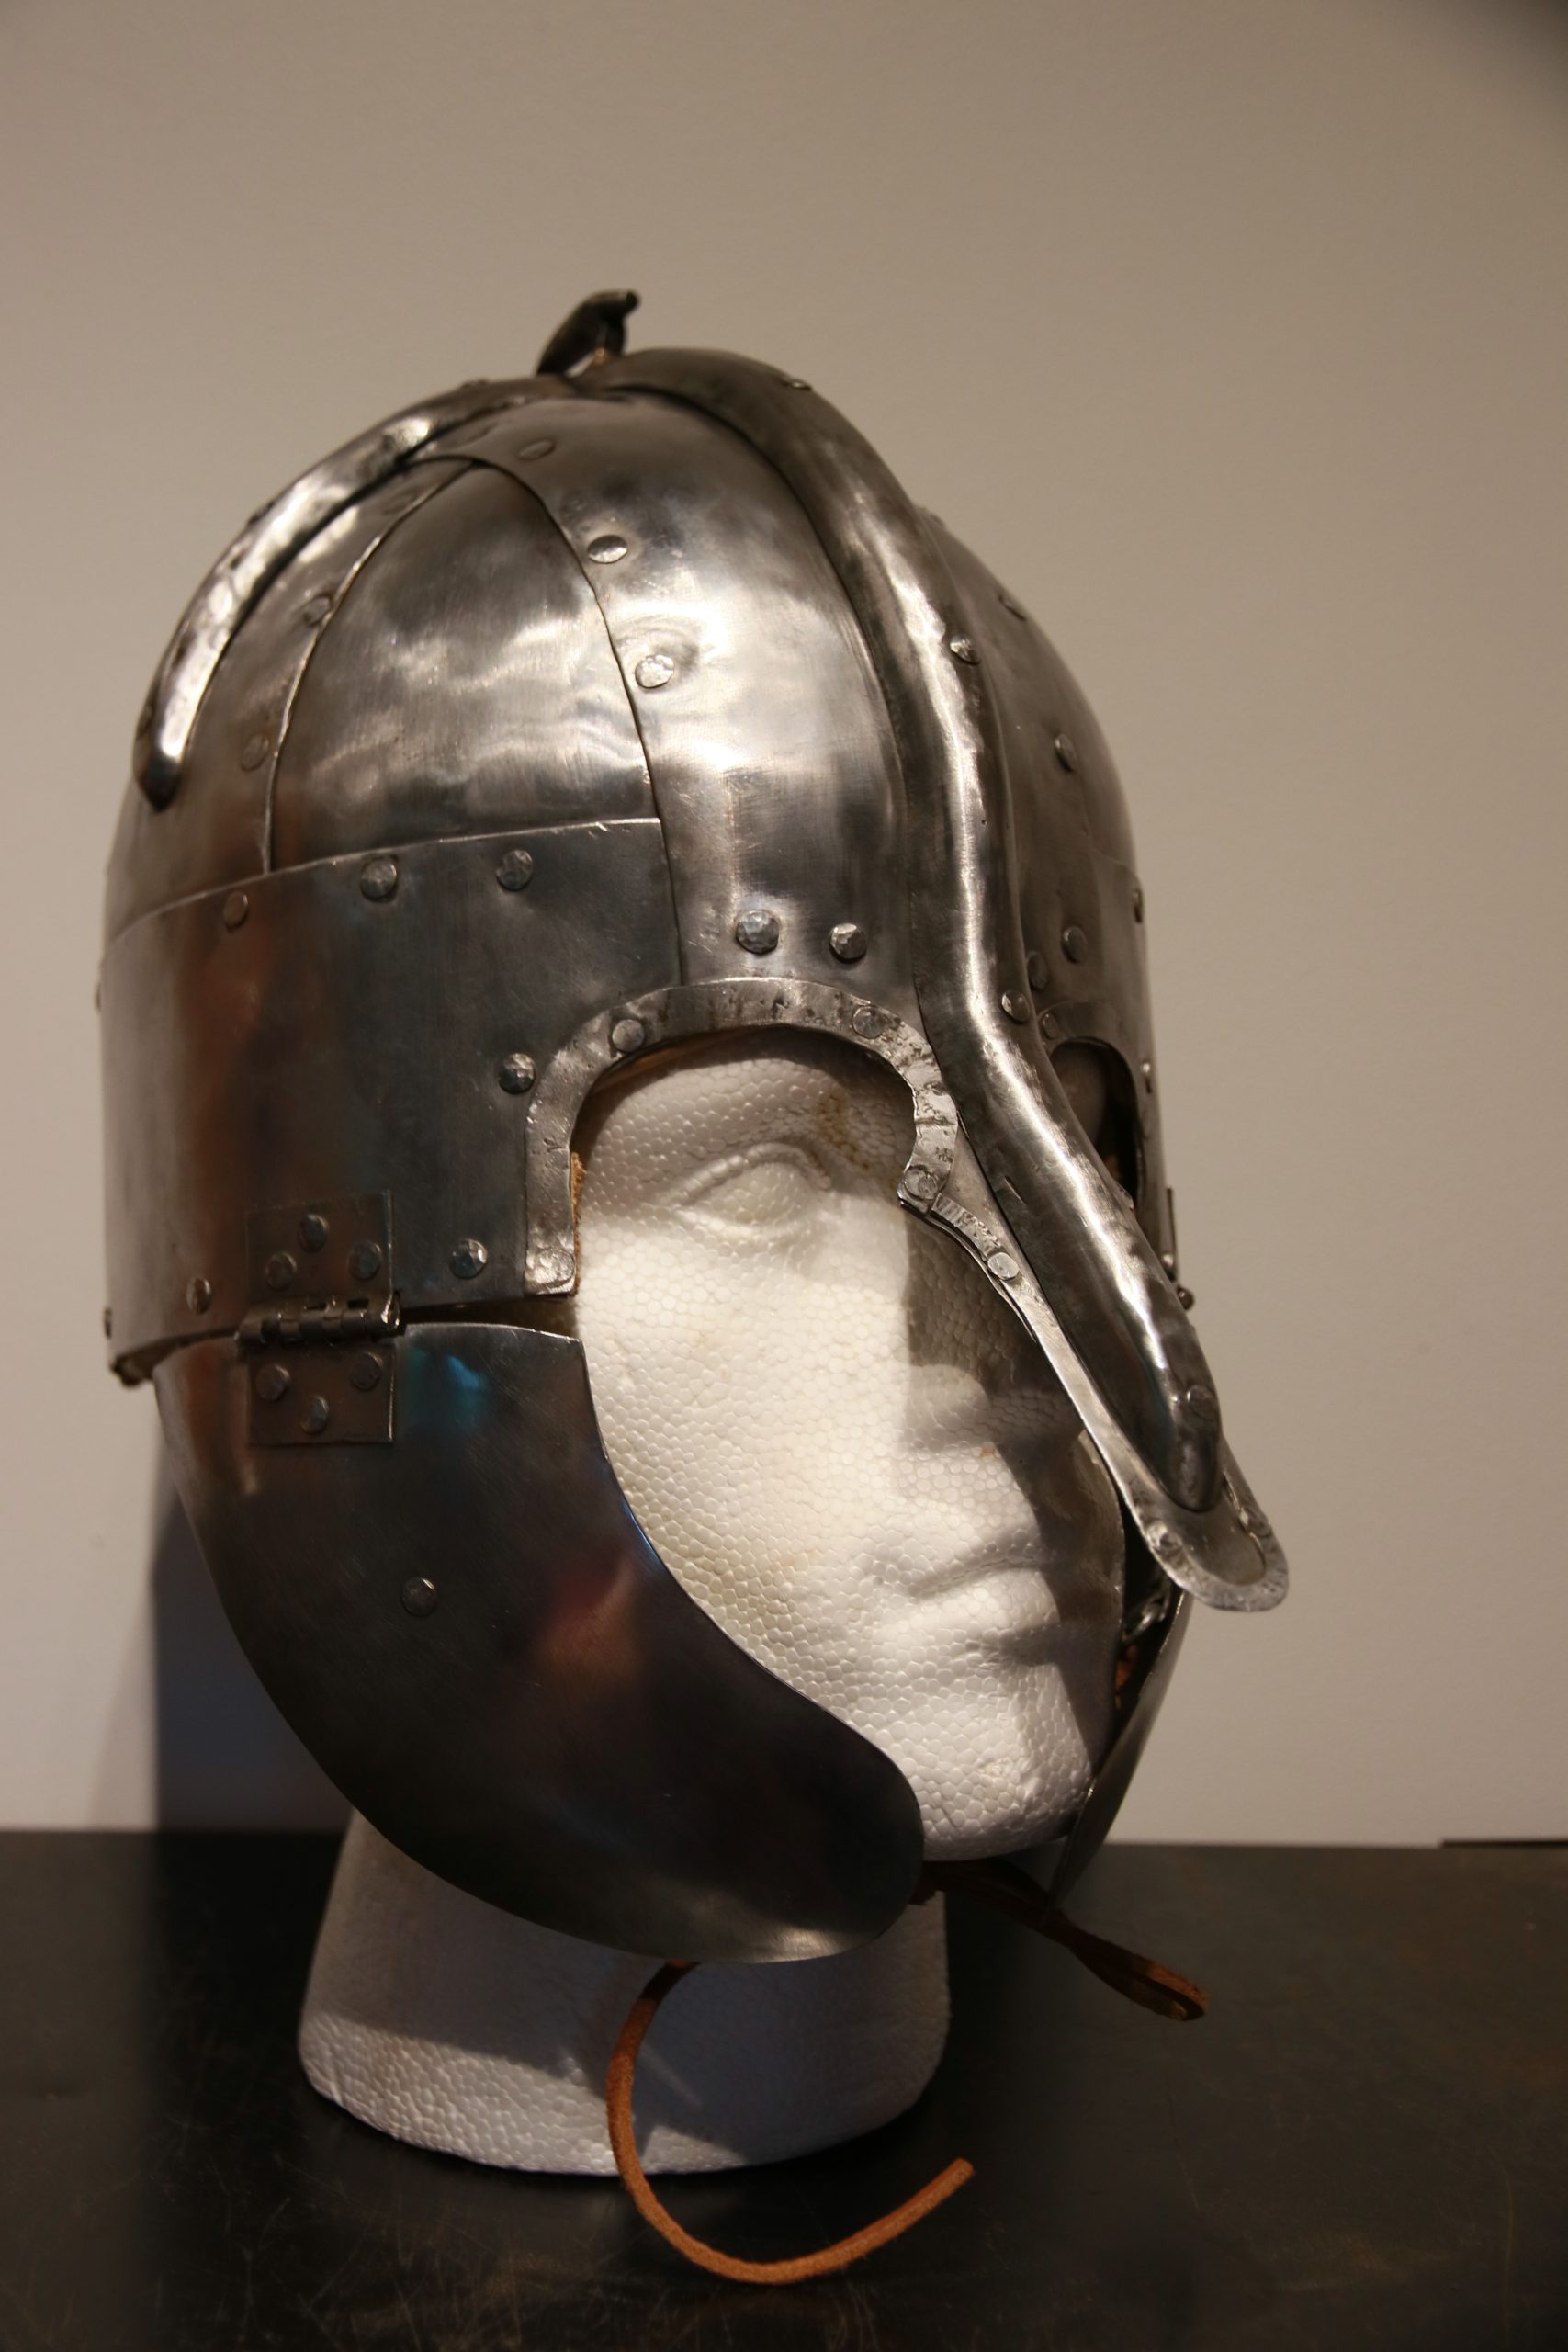
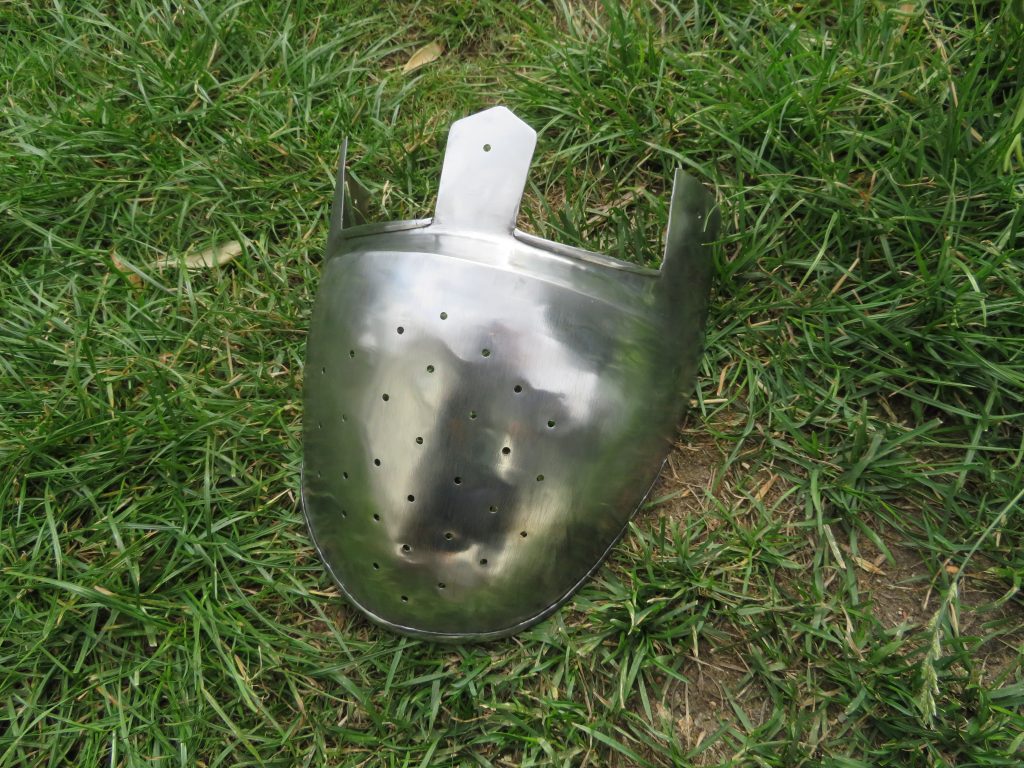
An enclosed helmet is the predecessor to the well known great helm that was used in the late 12th and early 13th century, which has a flat top, complete coverage at the front with a face plate and partial coverage around the sides and back. There are relatively few artifacts or depictions showing this form of helmet (at least freely available on the internet, that is) so there was a fair bit of interpretation as to the exact form and construction on my part for this. This was informed from some of the depictions in illuminations and also from other modern reproductions.
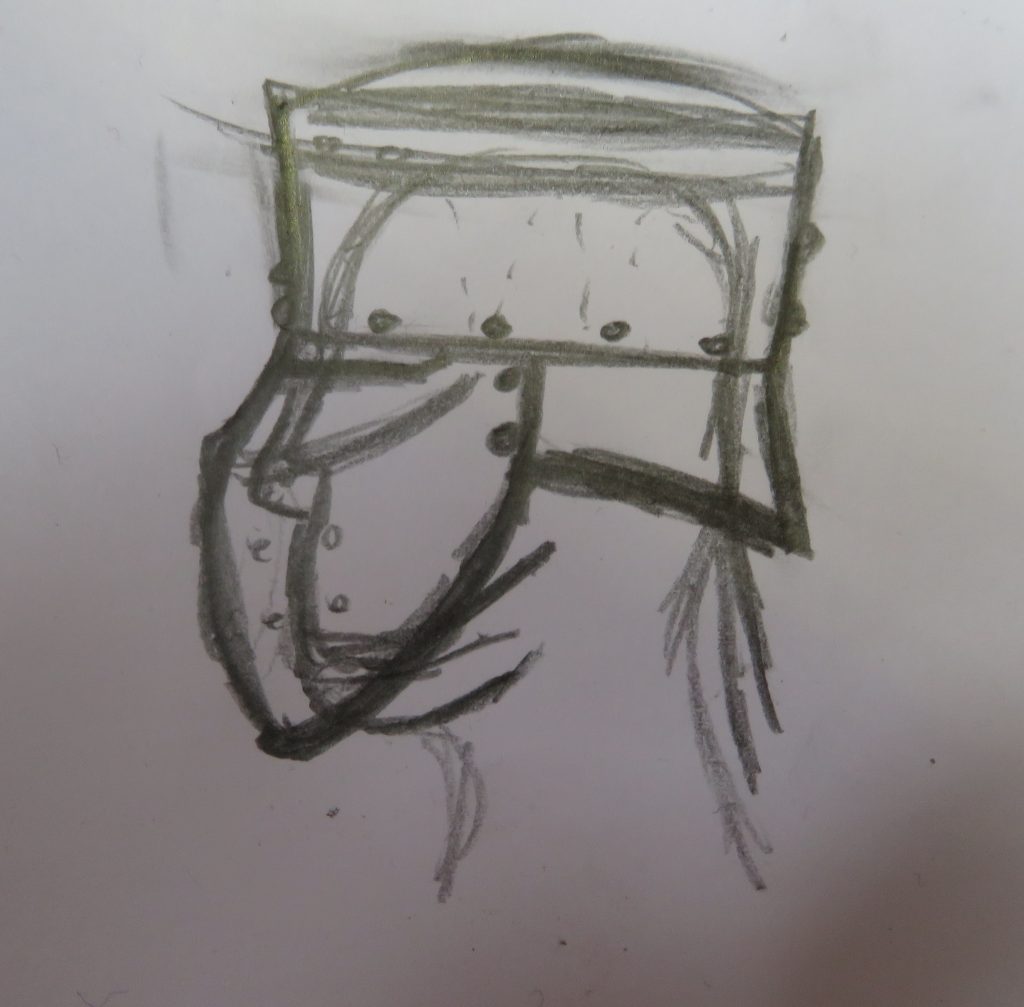
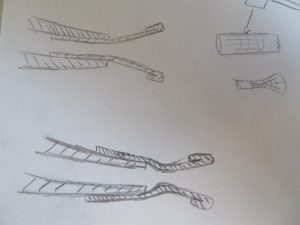
I began by sketching A plan for how I wanted the helmet to look and fit on a head. I planned a construction from four pieces: A face plate; a smaller back-of-head-plate; A long plate around the top of the head; and a circular top plate.


I then planned out the pattern for each piece. I started by taking measurements from my head with a fabric measuring tape. I made each piece over sized as it is very easy to cut them down later, but much harder to make them bigger.
I worked out the pattern for the upper plate using an online calculator for the net of a conic frustum, which gives it the larger diameter at the top than the bottom. I made a few versions of this pattern with different parameters and tried them on to determine the right proportions. I largely eye-balled the shape for the front and back plates patterns based on the upper plate pattern I selected and a few key measurements from my head. I didn’t make a pattern for the top plate as I would need to make that to fit one I had already shaped the rest of the helmet.


I marked up the parts onto steel sheet from the pattern and cut them out using hand shears. These can be somewhat tricky to use, mine definitely have a bit of a knack to them and I remember I used to struggle with cutting larger pieces out. I have found that it it much easier to cut out the pieces with lots to spare around the edges initially and then go back and cut closer to the line on a second pass. This means you aren’t trying to make accurate cuts and sharp turns while there is a large amount of material, which is harder as the shears work by bending the off cut away, which is harder when there is more material to bend.
I then de-burred the edges and cleaned off the surface rust with 60 and 80 grit flap disks on the angle grinder (I wouldn’t recommend flap disks for this as I have found they seem to leave a surface finish that makes things more difficult when it comes to polishing). Finally I remarked the areas where plates were going to overlap.
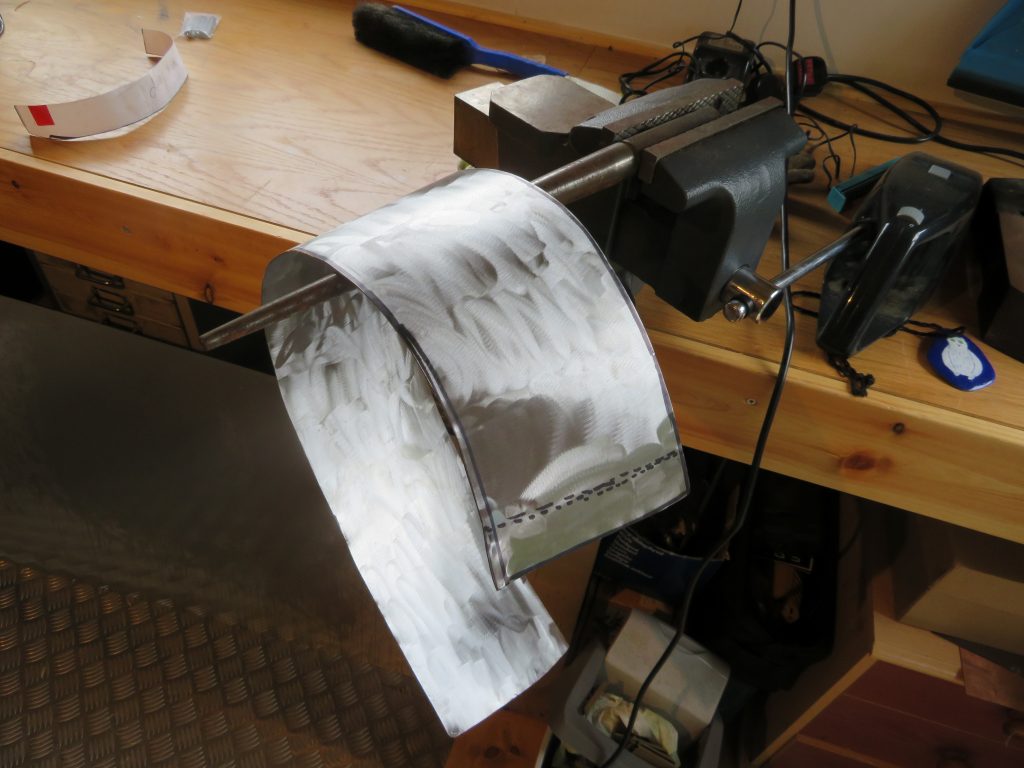
The upper plane was simple to shape as it only curves in one plane. I bent it by hand over a ring mandrel held in a vice, which was standing in for the horn of an anvil. I continually moved it and put small amounts of bend in at each point to give a smooth curve. At each end it becomes difficult to bend by hand as the leverage gets smaller and I needed to use a leather mallet. This is where I really missed having an anvil as the long lever action of the ring mandrel in the vice meant I could only get a few hammer blows in before I had displaced the mandrel and had to reset it in the vice. Once the part was shaped I punched 3 holes on the overlaps and temporarily secured them with bolts.


I shaped the front plate with a combination of dishing into a stump and raising over a mushroom stake to make the curvature for the fave plate. I then added a crease towards the top over a blunted chisel. Finally, I plannished the surface to remove the hammer marks.


I then married up the face plate and the upper plate to work out where they should overlap and marked up where the eye holes should go. In marking up the eye holes I had to account for the fact that I would roll over the bottom of each, which would make the holes larger. I cut out the eye holes using a combination of hand shears, a slitting disk on a dremel, and hand files.


Shaping the back plate was somewhat more difficult that the first two as I wanted it to flare out meaning it was curving in opposing directions on each axis, which is going against how the metal wants to move.


Once these plates were shaped I punched holes around the overlaps and temporarily secured them with bolts.
By far the most challenging part of this was shaping the top, which took me three attempts. The difficulty is that to join the top to the upper plate there needs to be a bend of more than 90 degrees all the way around the rim, which is creates a lot of excess material. Due to general frustration throughout this process I forgot to take many pictures.

In my first attempt I started by using the shape from the already assembled parts to mark out the top plate. I thought that adding some curvature to the top would make adding the bend around the edge easier as it would no longer be need to be such a large angle. This was not the case as it meant the whole piece started to warp making lining it up with the upper plate more difficult. I had initially hoped to have a solid rim all the way around but this was quickly proved not to be feasible so I cut four slits around the rim to remove some of the bulk and make bending it easier.
After a while working on this I decided I wasn’t going to be able to make it fit and to start with a fresh piece.
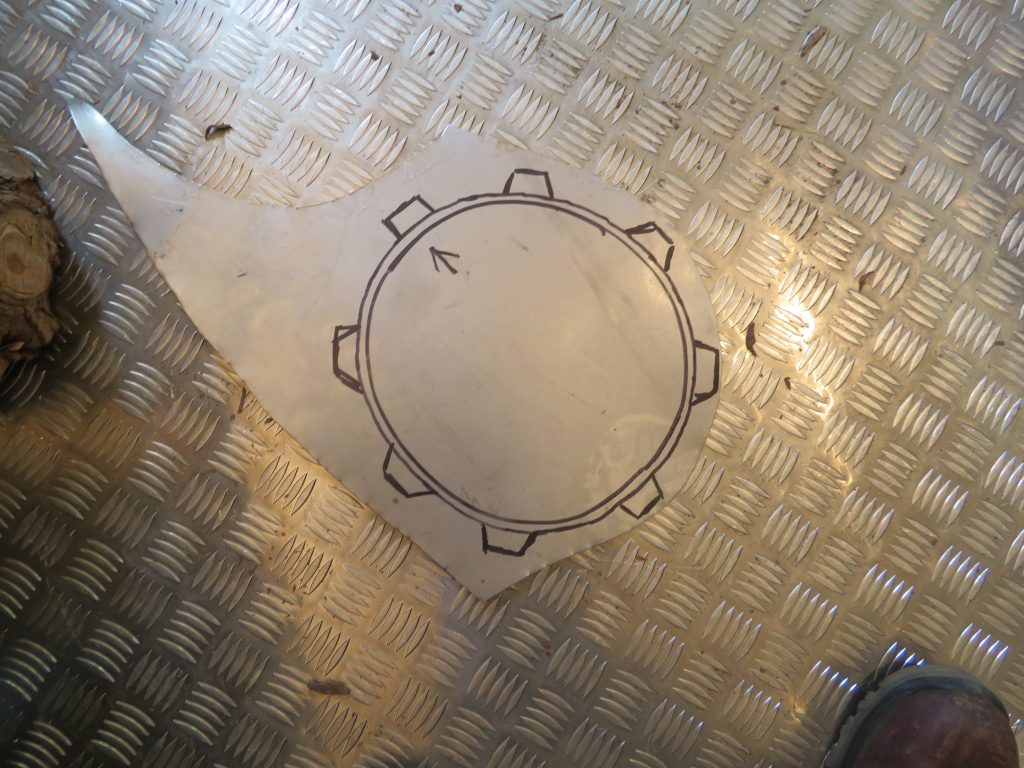
My plan for the second attempt was for the top to fit inside the upper, rather than outside, which was the plan for the last version, and to leave the top flat while I made the bend around the edge, which was only going to be a small amount of material with tabs around the circumference.
The main flaw in this attempt was the idea for the top to fit inside the upper plate as it quickly became obvious that this was going to leave a significant air gap.
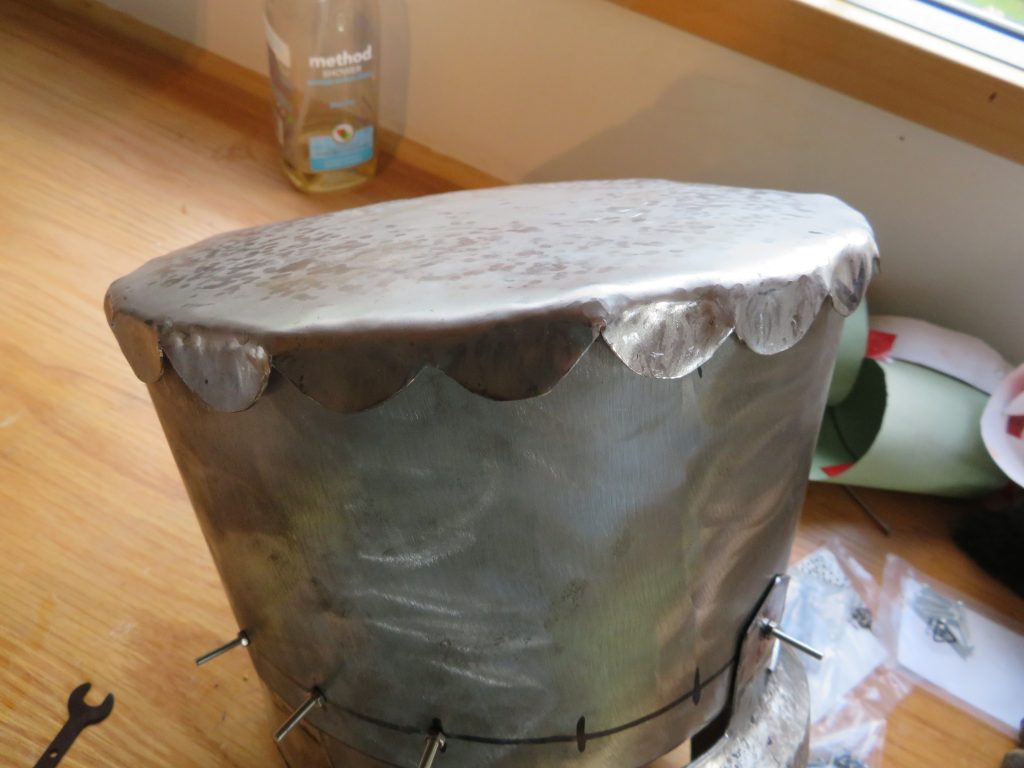
In the third attempt I decided to return to having the top fit on the outside and to have tabs all the way around. This proved to be much more successful and, once I had bent all the tabs mostly over I added a slight curvature to to top.
I then polished up each plate going through a successively finer grits of sandpaper followed by polishing compound on polishing wheel. To protect the inside from rusting I painted the inside of each plate with black paint.
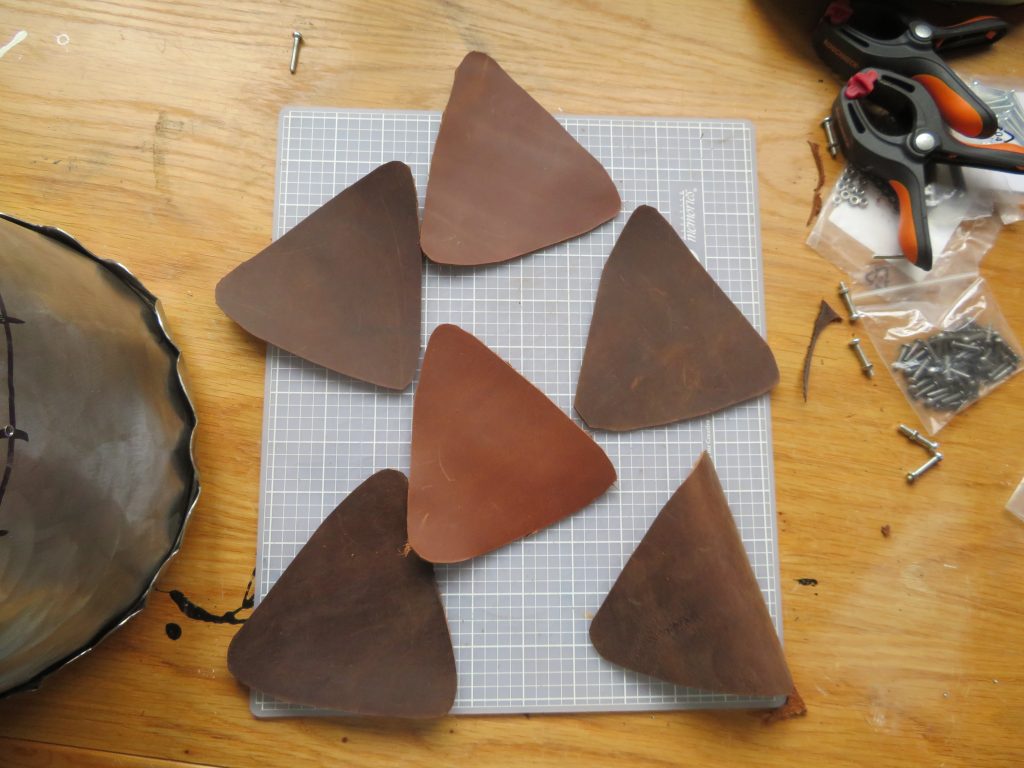
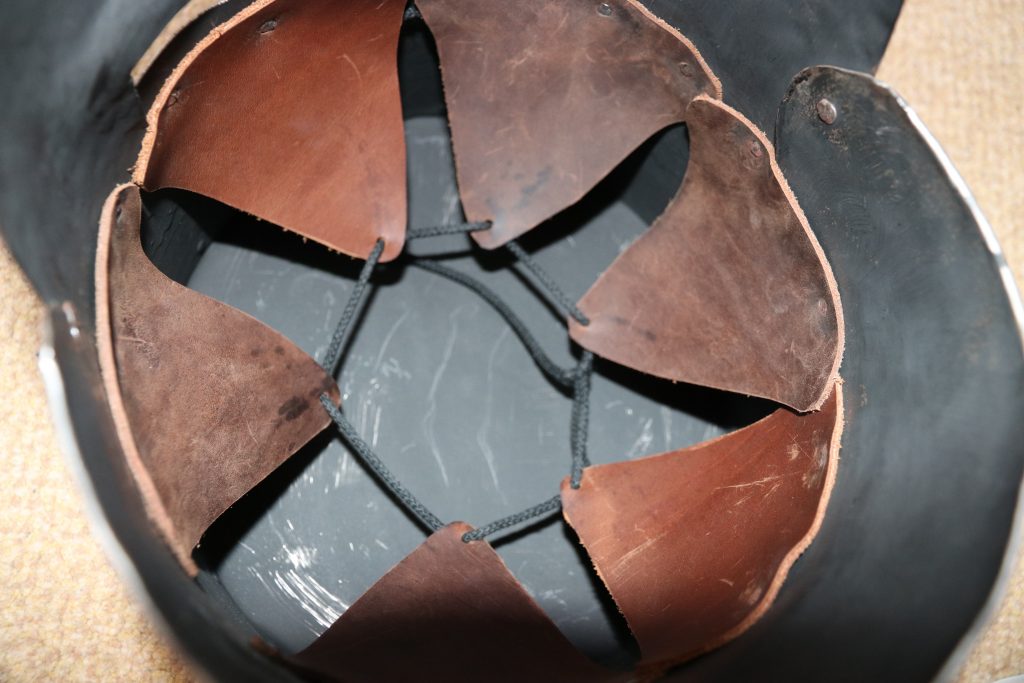
Finally I riveted all the plates together. The rivets around the brow band also held the suspension system in, which I made simply from triangles of leather each with an edge riveted to the helmet and then the remaining corners of each all loosely tied together. This system means that the metal of the helmet is not resting on your head, which would mean any impact would just be directly transferred, very similar to the suspension you find in modern hard hats. I am not sure this system of leather riveted directly to the helmet is particularly historical, from what I have seen helmet liners would more usually be textile and would be sewn to the helmet or to a second strip of leather that is itself riveted to the helmet. These systems allow the liner to be more easily replaced without having to grind out and replace a lot of rivets. Knyght Errant has a good video on the helmet suspension systems for those who are interested.
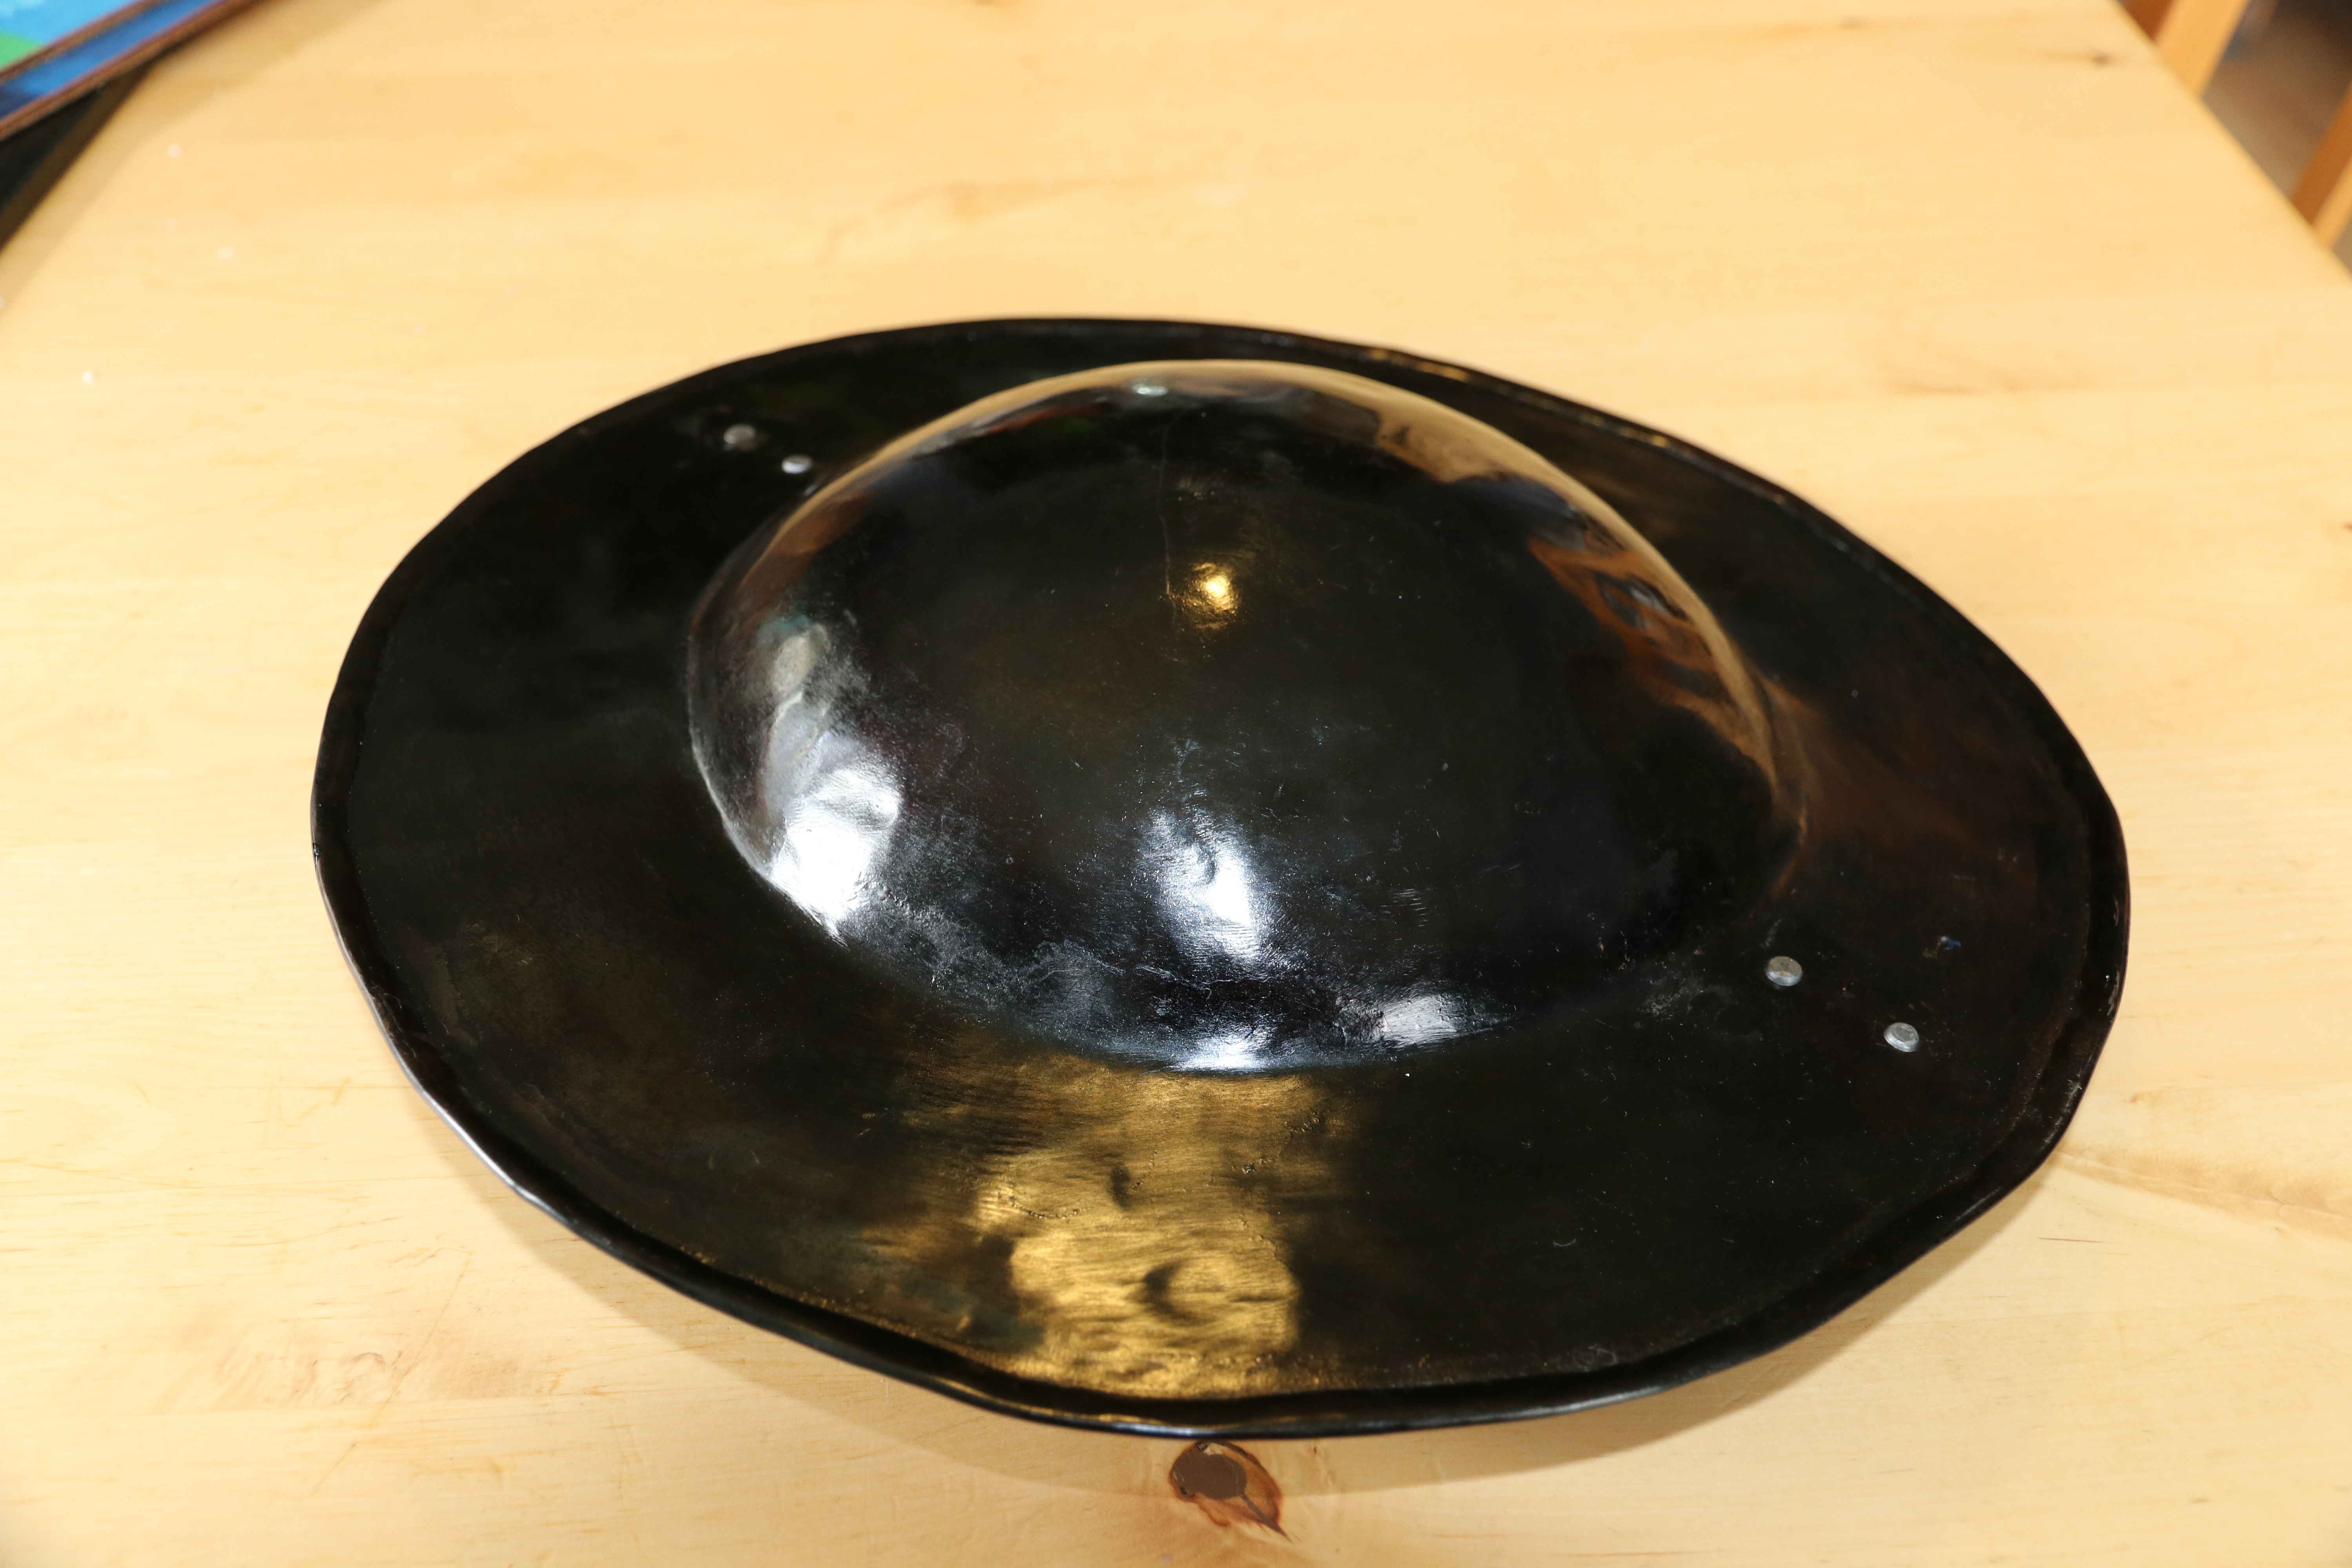
A buckler is a small shield held in the hand (rather than strapped to the arm). This was largely a project for practicing dishing and trying to get greater depth and cleaner edges than I had managed previously. Later ( after I got bored with polishing) it also became an experiment in oil-blackening. This isn’t really based on any particular example and as such makes no particular claims of historical accuracy.
The start of this project was to carve out a dishing stump. I cleared out the bulk of the material with a handaxe ( Those wild cuts are from when the stump was previously used for chopping wood, i’m not THAT inaccurate) and then smoothed it out using a flap disk on an angle grinder.


I cut a circle out of sheet mild steel with hand shears, taking a rough guess at the size I wanted and adding extra diameter to account for reduction during the dishing. I overestimated how much reduction there would be so it ended up being larger than I intended. This was due to the fact that I was only dishing a section in the middle and leaving a wide rim around the edge, which would not get pulled in, meaning basically all the movement was from stretching and thinning the material rather than pulling it through.
I then marked out a circle for the size of the boss (bump in the middle) that I wanted and began a series of passes of dishing. This simply involves beating the metal down into the depression of the dishing stump, which I did using a 2 pound ball peen hammer. This was a newly purchased hammer, which I intended to add something with a bit more heft to my collection of hammers (most of the rest are really silversmithing hammers which aren’t big enough for larger jobs in steel) but after a long time away from bashing things with hammers this was initially rather heavy for me. A summer making armour does wonders for your right arm strength though.
As you can see in the pictures the dishing introduced some warping in the rim, which I had to work out. Once I had got the depth I wanted I planished it and went around the edge hitting it from the inside against the curved edge of my psudo-anvil (lump of iron I have gone at with an angle grinder to make different shapes) to make a clean edge to the boss.


I then rolled over the edge. I started by cleaning the surface o f the part that was going to be folded over to prevent rust being trapped in side. I then marked out about a centimeter in around the outer edge. I rolled the edge on this mark by beating it over a steak. I then made the base for the grip by bending a strip of steel. I cleaned the whole surface of both parts with successive grits of flap disks on the angle grinder and some hand sanding, which was a very non ideal process that lead me to get bored and decide to try oil blackening it instead.
I had done a tiny bit of oil blacking in engineering ( read: metalwork) GCSE a long time ago and some cheats blackening with stove black on the armouring course I went on but I needed to do a did a bit of research to work out what the proper process would be. This yielded two main facts: that you could really use any kind of oil; and that there were broadly 2 possible methods. You could either heat up the whole piece and then quench it in the oil or heat the piece and then wipe on the oil a section at a time. I would have to go for the second option as I had neither a method for heating the whole piece or enough oil to hand to fill a vat of sufficient size to dunk the whole shield in it. As to the choice of oil, I selected olive oil purely for its virtue of being quickly acquirable through a raid on the kitchen. To heat the buckler I used a propane torch.


")
After heating up the whole buckler and surrounding area I worked on a process of heating an area of the shield, applying the oil with a spray bottle and a rag, and then heating that area from the opposite side to bake on the oil until it reached the desired colour. The problem I encountered was that in some cases the oil would some how ‘burn off’ and patches would return to the silver colour of the metal. This seemed to be related to areas getting too hot as once this happened this area would remain stubbornly un-oiled no matter how much oil an heat was applied until the whole thing was allowed to cool completely and the process started again. Over three attempts the buckler moved through a yellow colour, to brown, and finally had an even shiny black finish.

I then fitted wood on either side of the metal for the handle, securing them with large rivets sold for attaching spade heads with. I painted the backside of the buckler with black paint. Once the paint was dry I drilled two holes on opposite sides of the rim and riveted the handle on to the buckler.


")
(Shout-out to my father’s hand for being in this picture)
Overall this was a relatively simple piece of metal work that served as a good project to get back into the swing (pun very much intended) of hitting things with hammers. Learning oil blacking is also pretty valuable as it was a commonly used finishing technique for armour historically and, crucially, is much less tiresome that polishing things.
Last year I went on a short course in armouring at west dean college. This was enormously enjoyable and also gave me a better grounding in the techniques to be able to take on some more challenging pieces of armouring over this past summer (some of which will have already been posted when this article is released).
Obviously as this was from a paid course I won’t provide any instruction but here are the progress pictures I took at the end of each day.


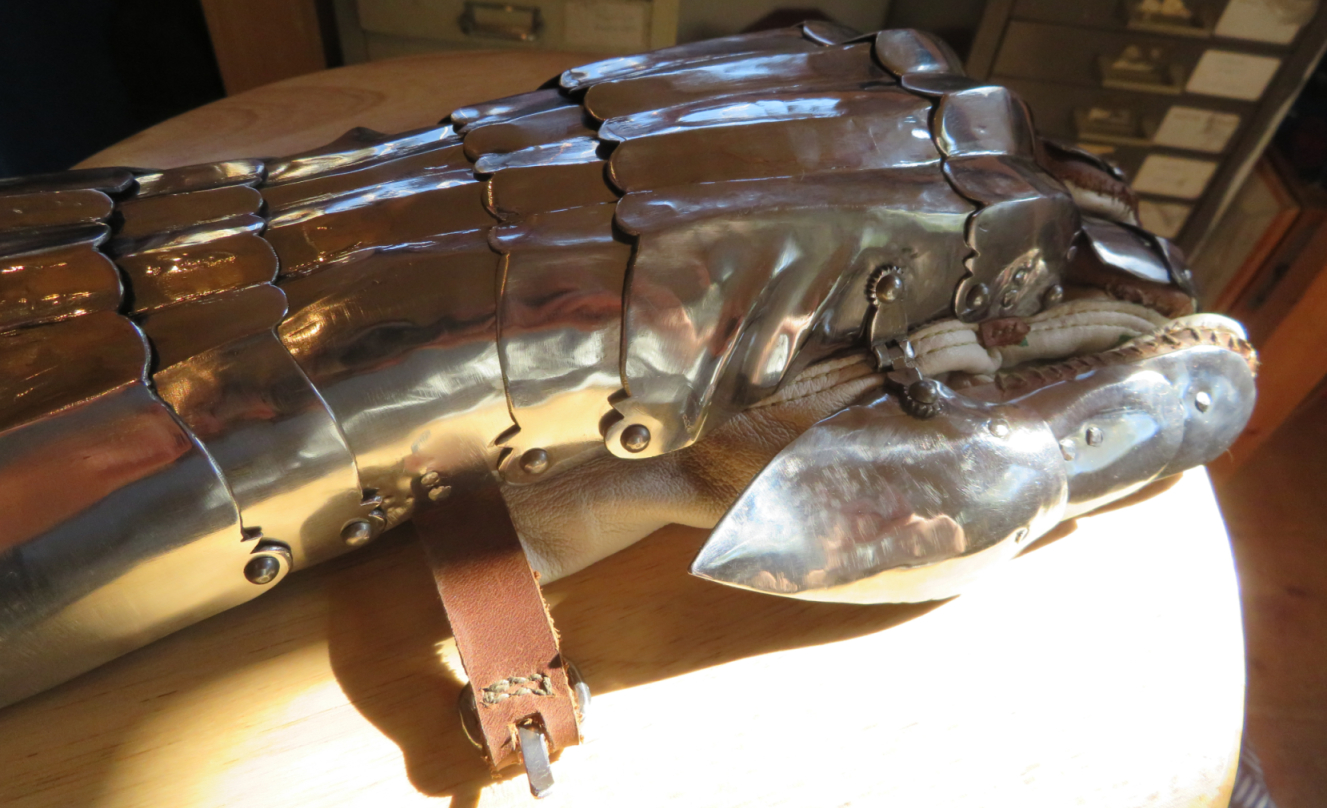
I made a Gothic gauntlet following a tutorial series on youtube by Greenleaf workshop (
https://www.youtube.com/playlist?list=PL_DVxRBaoNVUvXE1kywNLrH6edNVmUz25 ). Here is the process presented in video format.
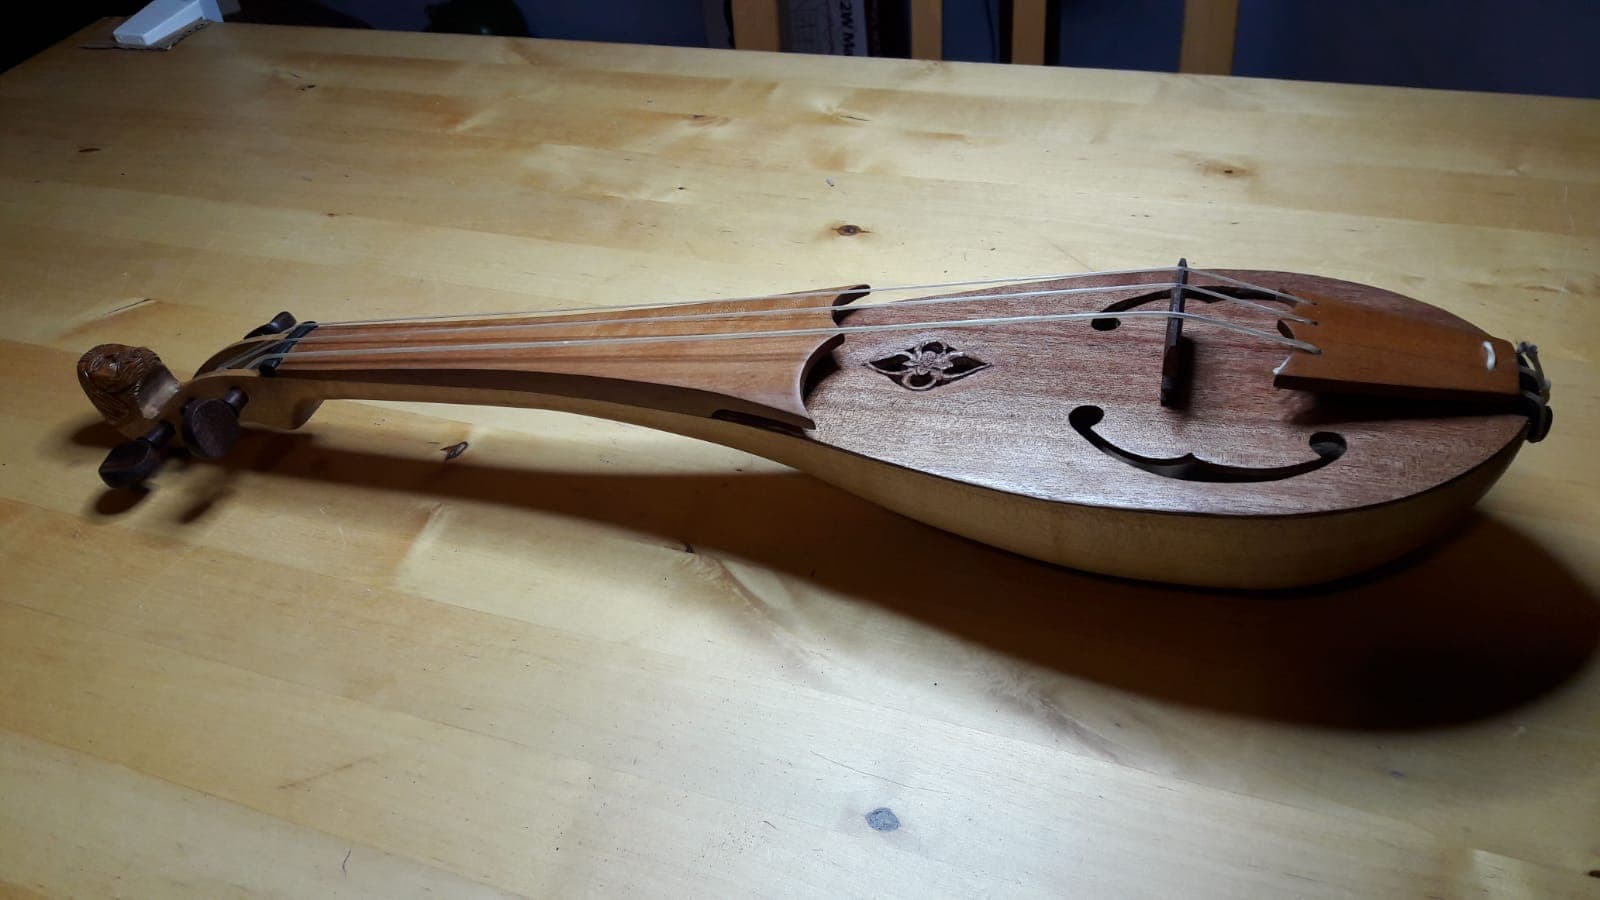
So, I finally got back to this one…
I think part 1 contains enough preamble (and you should probably read that part if you haven’t already) so lets just get right into it.


To start with I needed to remove the old sound board and then clean up the whole instrument, removing all the old finish to make it ready to start putting back together.I used a thin knife and a chisel to remove the old sound board. I had hoped to be able to remove it in one piece but it did end up breaking. Additionally a small chip broke away from the body with the soundboard so I had to glue that back in. At the same time I also glued up the long crack that was in the body. Once these glue jobs were dry I set about sanding the whole surface of the body to remove the old finish. It would not be possible to remove all the finish on the carved head without removing detail, so I sanded on the high points and left the finish in the troughs and I figured it would end up adding deeper shadows when I applied the new finish anyway.


I had two rebec bows without their horsehair, which I could use to work out how the hair had been attached, and then go on to repair one to use. Additionally one of the bows had split near the end so I started by gluing that together.
I worked out that the horsehair was held in the bow in a slot with a small piece of wood pressed in after to hold it in place. The other end of the bow had a groove with two hooks. I guessed that this was supposed to hook some expansion on the end of the horsehair.
I prepared the horse hair following instructions I found online: wrapping the hair with thread and then applying a drop of superglue to turn the tread wrapping rock solid. It took a bit of experimenting to find the correct place to put the second thread wrap to give the bow the correct tension when strung.


I started by tracing out the shape of a bridge for second rebec onto some of the spare wood for the sound board. I sawed out the rough shape and then sawed at intervals into the space between the feet and cleared it out with a chisel. From there it was a matter of cleaning up the shape with needle files and sandpaper.


I needed to make a few additional pieces: the saddle, end button and top nut. For these parts I used a few ebony scraps I got from a local violin maker. I started by sawing a large block in two to make the saddle and top nut, from there this was all file work to get them into shape and then clean up with sandpaper to get them to a nice finish.


Finally it comes to glue up and applying a finish. I just used standard wood glue on all the parts, there are fancier glues people use for violins but this seemed to work fine for me. After glue up I then went over everything again with progressively finer grades of sand paper to clean it up. For the finish I used Tru Oil, which is a gun stock finish which is also often used on musical instruments. I applied layers of that until I was satisfied with how it looked.
Out of a desire to get this finished before I went away from home again, I ended up deciding to just buy a new set of tuning pegs. So from here it was just a matter of stringing and tuning it and I was done! Hopefully I can update this at some point with someone who knows how to play violin having a go with it!


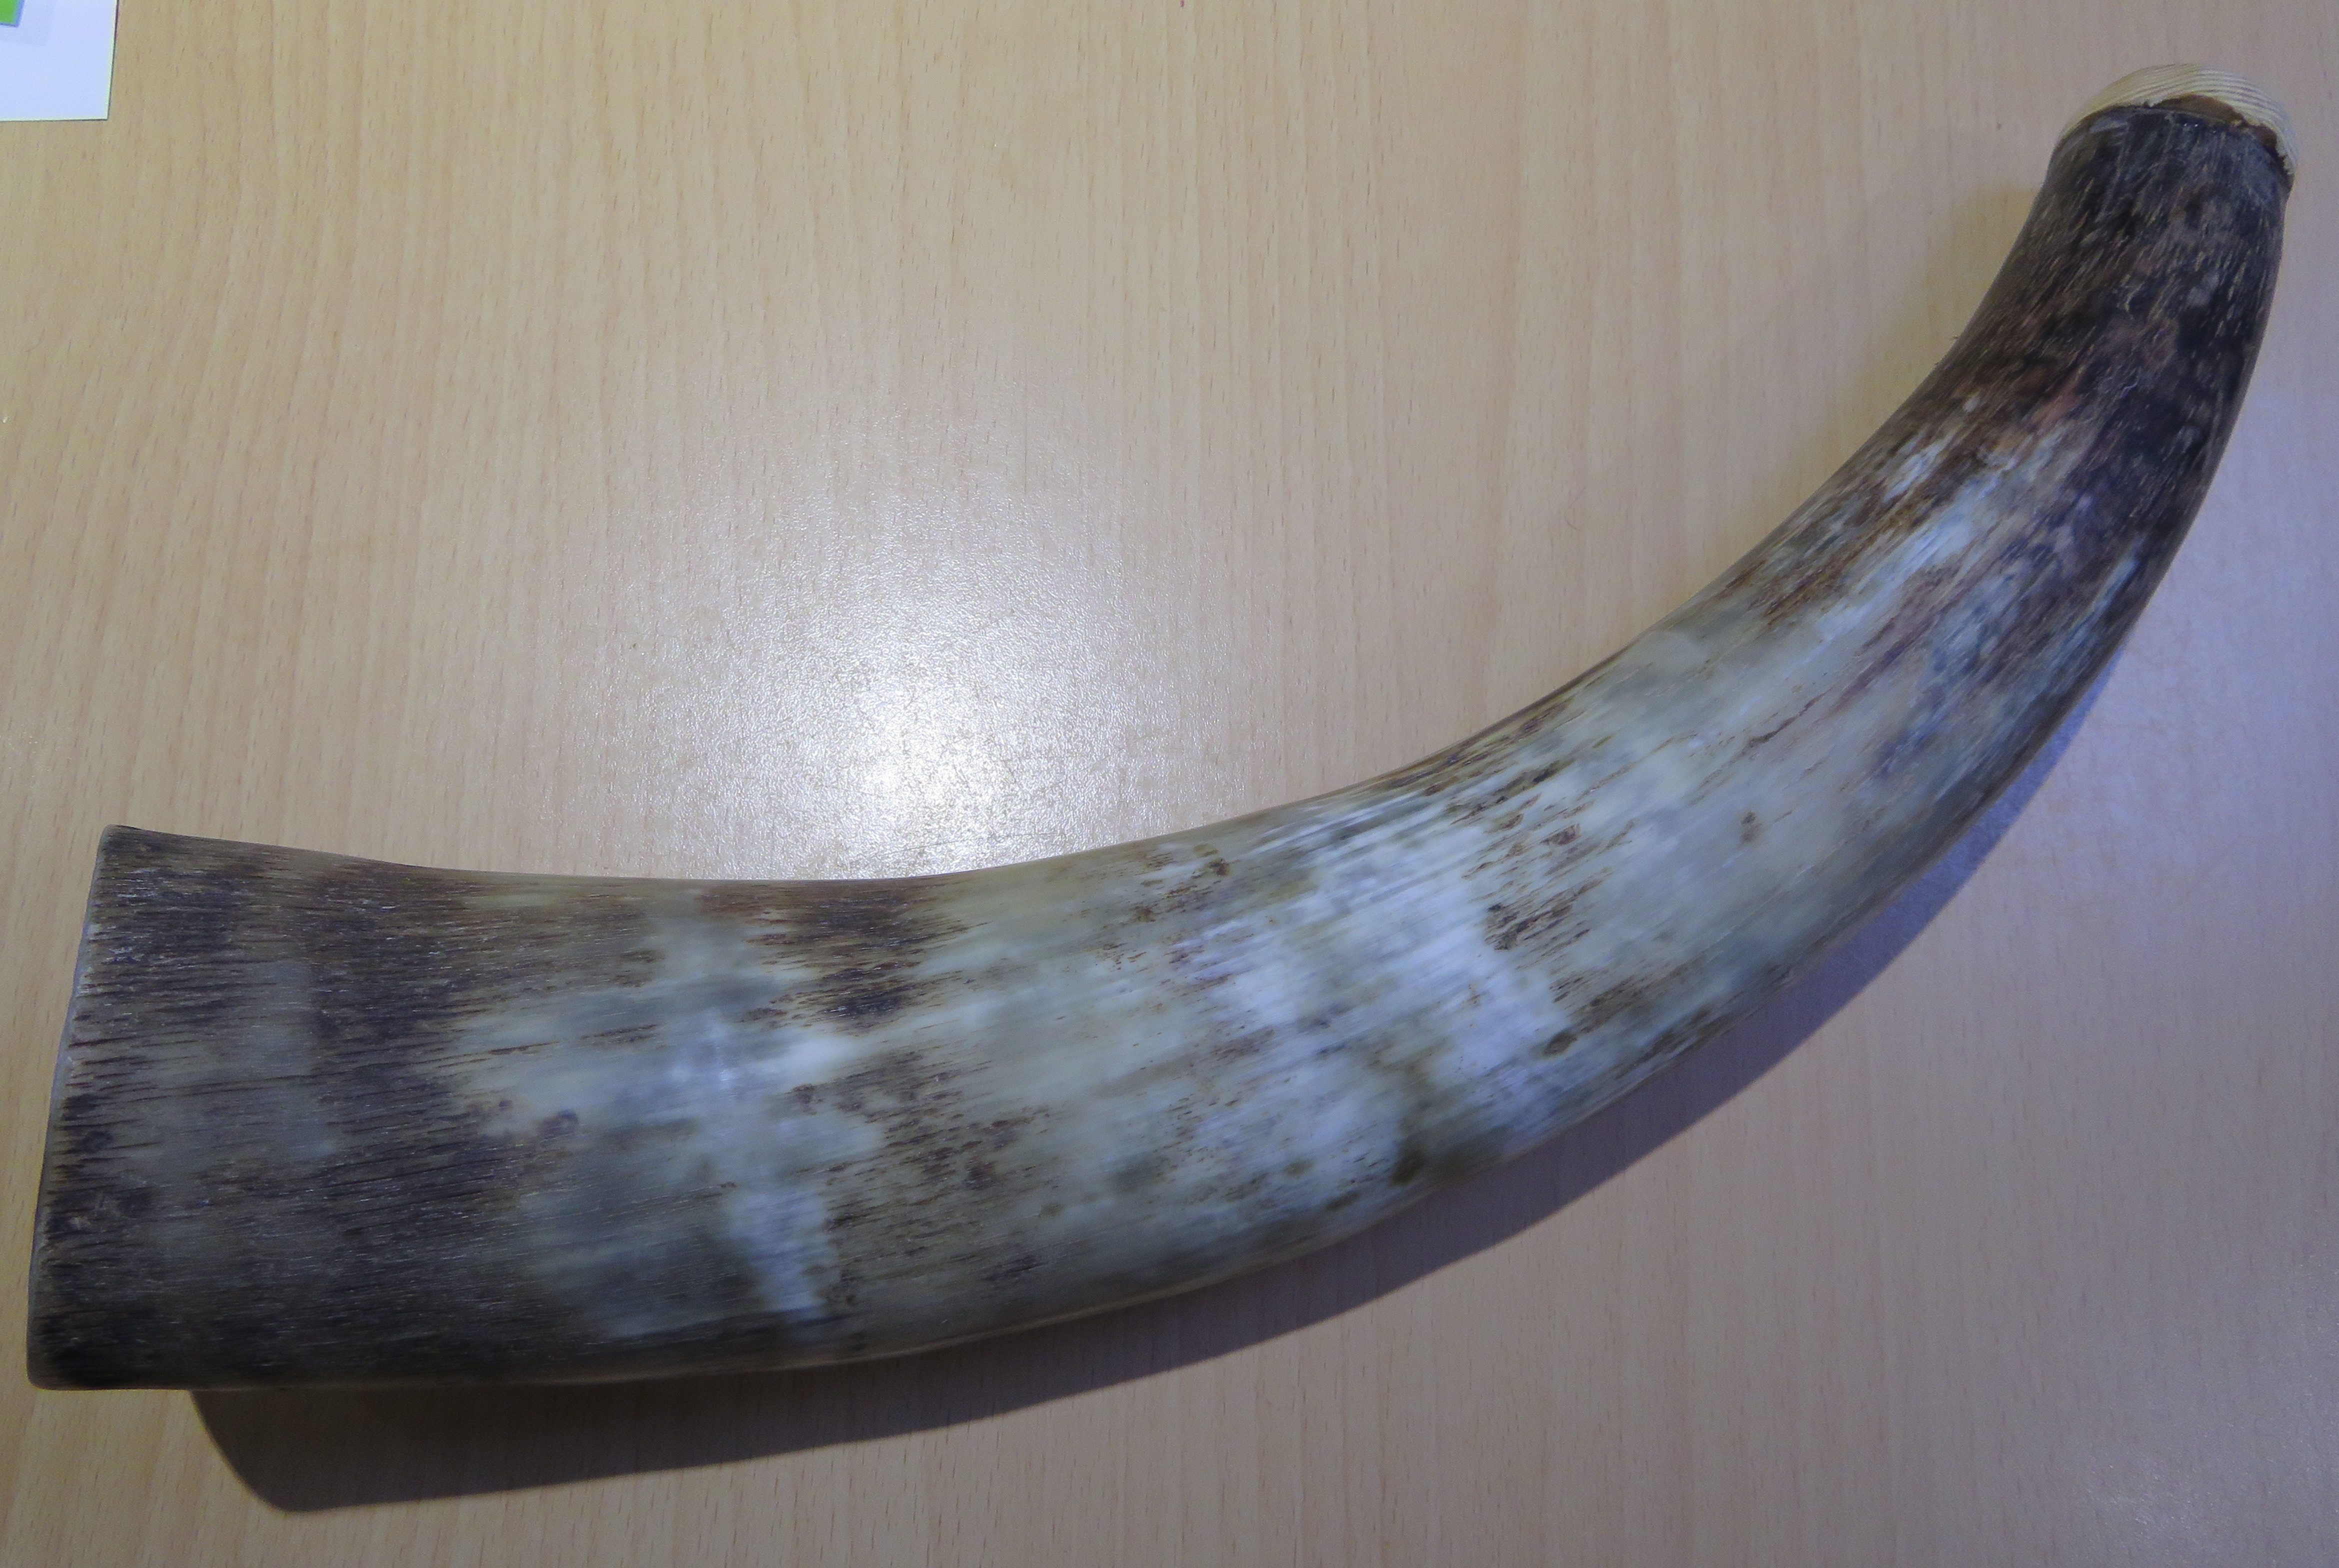
Ok, instrument is a bit of a stretch, I mean like a hunting horn or a war horn sort of thing. You would be hard pressed to get any music out of it. To be honest you are pretty hard pressed to get a single good note out of it. That is because the mouthpiece I made is not particularly good, which is ok because the point of this horn was experimentation. I got myself 3 horns: one really big one and two smaller ones, one that looked really nice and the other that had some defects and a rather rough surface. I started working on this one first to try and work out a good way to make them and if it didn’t work it wasn’t a huge loss as I still has the two nicer ones.
The horns I bought were pre-cleaned out, if they weren’t there would be a lot of preamble cleaning out the stuff that is on the inside of the horn. this is rather outside the scope of the article as I have no experience with this, if your horns are like this do a bit of searching and you will quite easily find instructions on how to do this.
There is really very little that has to be done to a cow horn to make it into an instrument, most of it is already pretty much in the required shape. All that needs to be done is to put a hole through the pointy end and make that into a mouthpiece. Horns use a mouthpiece like that of a brass instrument, which are much simpler than what you find on other instruments such as woodwind. You can actually just make do with a plain old pipe with no embellishment at all (this is actually a training exercise sometimes used for people learning brass instruments) but this is a lot harder to play and doesn’t sound so good. The basic shape of a brass mouthpiece is a narrow tube that widens into a bowl like shape, which is where the lips are placed.
My first method of making a mouthpiece was to cheat and not make one at all and just steal one from a brass instrument and stick it in the horn. To do this I cut a small piece of the point off the end to give a flat face and then drilled a hole through the solid end of the horn into the hollow bit. Then I put the mouthpiece into the hole and it worked pretty well.
That isn’t really in the spirit of things though (and it didn’t really look that good) so I set about thinking about how I could best make something myself. All the most proper ways to do it such as casting something and turning it on a lathe or turning it from wood were not really options for me. I attempted raising something from sheet metal but that quickly turned out to not be feasible. My next idea was to try to carve the bowl of the mouthpiece into the horn itself. To do this I had to make another cut further up the horn so as to get the larger diameter necessary. The trouble turned out to be that the horn did not take kindly to being carved and it proved impossible to bit a curve into it and I just ended up with a flat edge. This hadn’t really worked but the main trouble was that I had painted myself in to a bit of a corner as the end was now really wide and had a large hole in it, which rather limited my options for new ideas.
The next plan was to make a piece out of wood that would sit in the gap the last failure had left and then to a carve the bowl of the mouthpiece into that. This also did not really work. Partly because of the wood that I had at the time, which did not take to carving very well, and also because of my tools forming the bowl proved to be rather tricky. Had I had a lathe I think this would have probably worked (though I am still not sure how good a wooden mouthpiece will ever sound) but working with a fairly large set of chisels in poor quality wood it wasn’t really going to work.


This then leads to my last attempt, which was easy enough to execute but doesn’t work very well. I cut out a ring of wood and curved one side to give it a better surface to blow on and then glued this to the end of the horn. It doesn’t look particularly good and could have been made to look a bit prettier but once I had seen that it wasn’t going to work I didn’t think it was worth it.
Finally I polished up the horn, which was just done by working through steadily finer grades of sandpaper. Because the surface was fairly rough and had some cracks in it it wouldn’t be possible to get it to a really high quality finish. For this stage its important to wear a dust mask as, with any process that produces a lot of dust, it really isn’t something you want to be getting in your lungs.
I was going to record a clip of me playing the horn to demonstrate the sound it makes but I forgot to do it before I left and as I am the only one of my family that plays a brass instrument (and this one is a notably difficult one to play) I can’t ask and of them to record it for me. If I remember to do it when I return home that may be added to this article at some point.
During the course of writing this article I came up with an idea for how I might be able to make a mouthpiece. That is to buy a metal tube and then hammer that into to shape. This would probably be quite a complex thing to do but I think would be much more achievable than working from flat sheet. Unfortunately this horn is a bit too far gone for this to work so it will have to be saved to try out on the next one, whenever I end up having the time to make that.
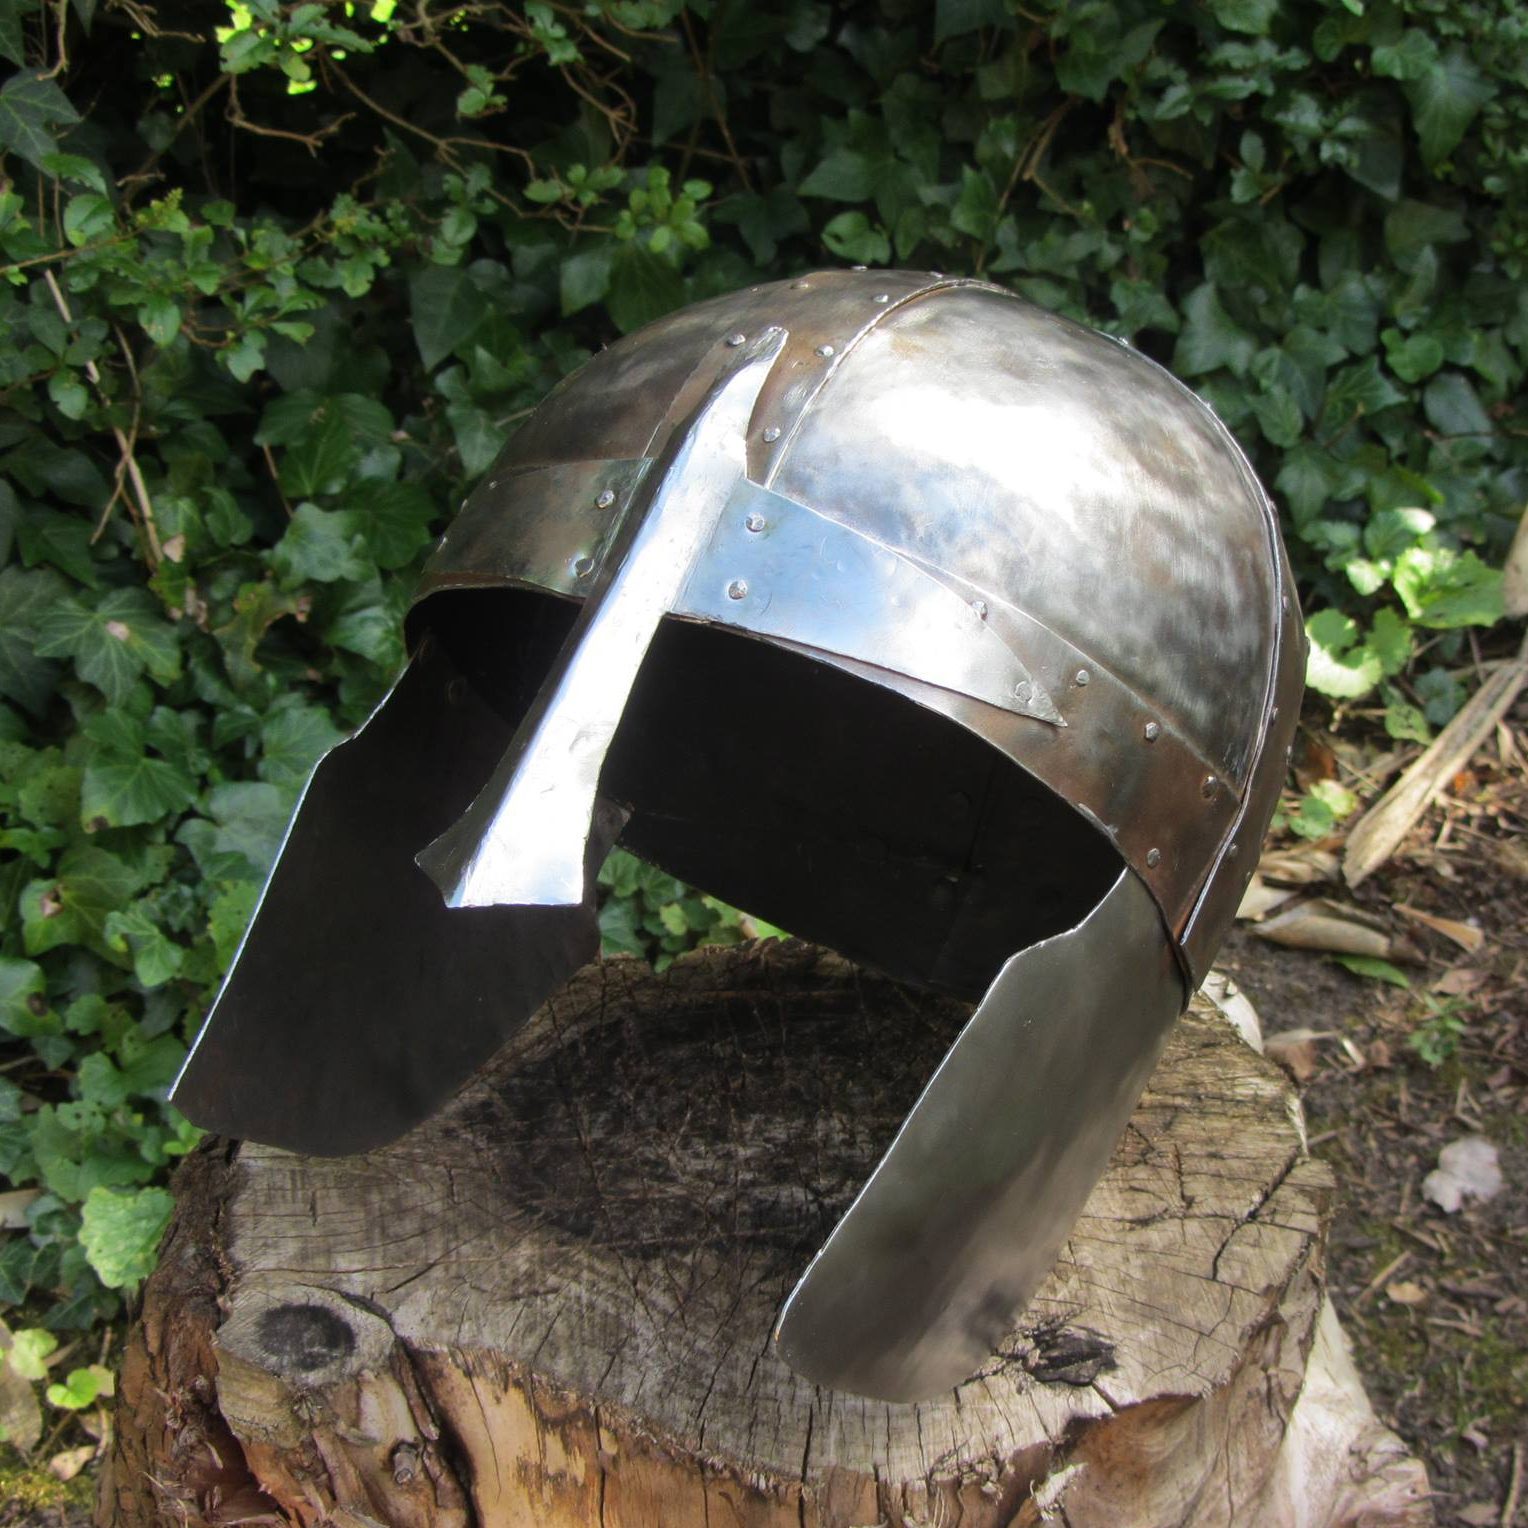
Armour is probably one of my favourite things and what really got me into making things. I had always liked craft but digging into information about making armour on the internet (large amounts of it wildly inaccurate) was what got me properly interested in taking on some more substantial projects, the first of which was this helmet which I made ~5 years ago. The helmet in question is a type of nasal helmet (referring to the bar sticking down covering the nose) called a spangenhelm, which is a word of German origin referring to the strips that form the frame of the dome of the helmet. Its is a design from the early middle ages which is fairly straightforward to construct and was later superseded by helmets of the same basic shape but with the skull constructed from a single piece of metal which, while being sturdier are a reasonable amount more tricky to make. The main difference as far as I am concerned being that heat would be required whereas with the spangenhelm, while it would be easier with heat, it is possible to make do without (this is only the case for modern people with access to pre-rolled sheet steel, historical smiths would not have this this luxury).
As this project is so old I will not be able to do a complete tutorial and some of the steps may be slightly vague. If you want to make a similar project then I would suggest doing a bit further research.
My helmet has a number of issues, the foremost being that is doesn’t really fit me. This is partly due to it being completely circular around the brow, rather than something a bit closer to the actual shape of a head. It is also partly just down to being a bit too small, which is most noticeable when you are trying to put it on as the cheek plates will have a bit of a fight with your face as you try to do so. There are also a few issues with the shape relative to historical examples. Typically nasal helmets seem to be fairly conical in shape rather than the more spherical dome I ended up with. Thinking about this now I would say that this is because the shape I used actually presents a relatively flat surface on the top, meaning any blows from above (which is really where a large number of blows would come from) would not glance and would transfer most of their energy through to the wearers head. On the other hand a conical design would provide a better glancing surface and thus better protection.
The other thing that I notice looking at more examples is that the nasal is usually flat and even when it does have an angle put into it it is much less pronounced than the one I put on mine. This is a bit harder for my to work out as it seems like my design would be stronger and less likely to give way if it were struck. My guess is that the angles on my design may run the risk of redirecting thrusts into the wearers eyes, though I think that in any situation where this were to happen the result would be pretty similar if the the nasal were flat.
One important element that is missing entirely is the leather suspension that would run around the inside of the helmet and cause it to float above the wearers head rather than the steel sitting directly on top of your head (equivalent to what you would see on the inside of a builders hard hat) . Without this the helmets effectiveness is greatly reduced as, even with padding, and impacts are largely transferred directly though the helmet into the wearer’s head.
The final issues with the helmet are simply issues of execution: It is overall slightly lopsided and the overall finish is not as good as I would like it to be if I were to remake this project now.
The main process used for making the helm is ‘dishing’, which is in principle fairly straightforward. Dishing involves hammering a piece of sheet metal into a concave recess in order to curve the metal in multiple directions. It requires two tools: a dishing stump and a hammer.
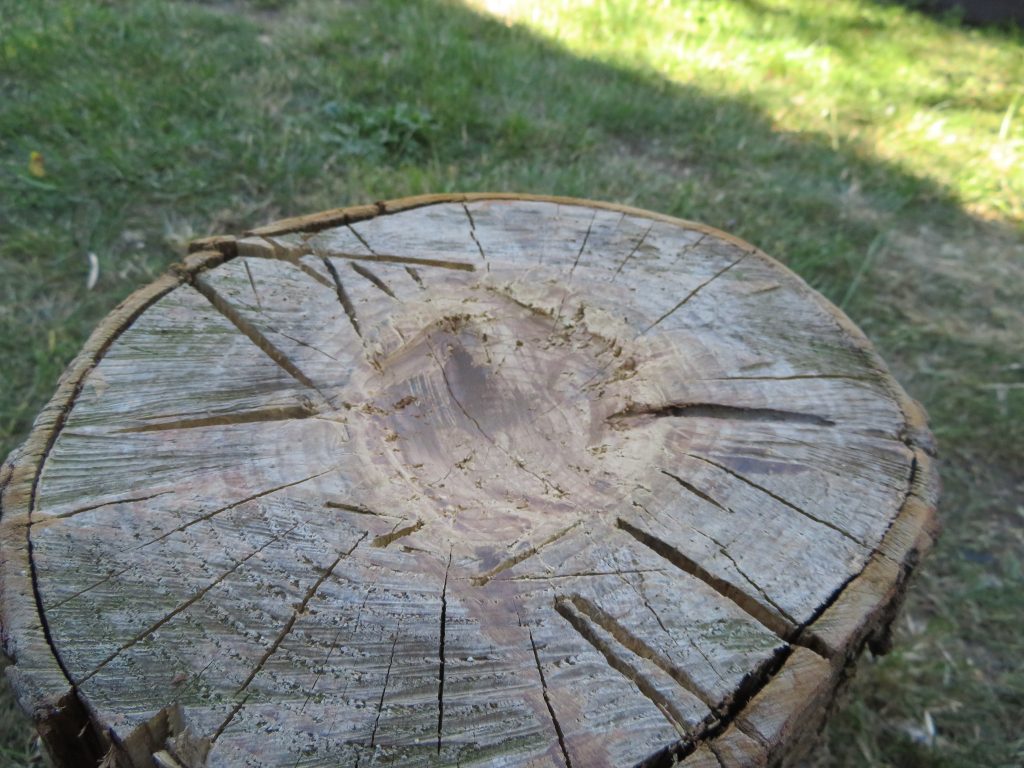
A dishing stump is most commonly made from a fairly large tree stump (hence the name) but really any bit of wood will do. Ideally it should be reasonably substantial so as to have enough mass as to not bounce around every time you hit into it. What I ended up using was a rather lightweight tall thin-ish bit of wood that was left over from some building work that had been done on our house (looking back at the picture of the helmet you might notice that its sitting on a stump that looks pretty much like what I initially described and wondering why I didn’t use that and to be honest so am I). Once I had selected my stump I then cut a concave bowl shape out of it with a chisel and hammered inside it to compact the wood and harden the surface. The exact shape is not hugely important as you are not hitting the metal into the inside surface of the form, just in to the space. All the form needs to have is an rim that will support the piece and a void into which you can push the metal. As for the hammer you need something with a reasonable amount of weight to it and a fairly rounded surface without any sharp edges. The hammer also needs to be of an appropriate size to fit your dishing form.
The first thing to do before starting hammering away at metal is to work out the pattern. This is a stage that I didn’t execute particularly well, which Is why my helmet didn’t really fit properly. To work out the pattern start with a measurement around the circumference of your head and then add on a fair amount to allow for padding. Use this measurement to make a long thin rectangle (out of card at first), which will be the brow band running around your head. Then you need to measure over the top of your head front to back and left to right (again adding on some extra for padding) and make two more long thin rectangle to these measurements to from the bands that go over the top of your head. now put these pieces together and try out the card version of your helmet and see if it works. If it doesn’t go back and adjust your pattern. Once you are happy with the pattern you can then cut these pieces out of some sheet metal using shears. Then take a file to the edges of the pieces to clean them up and remove any sharp bit left from the cutting.
Now to curve the these pieces. This can be done using the dishing stump or, as they only need to be curved in one direction, just by hand. It is important to not give them perfectly circular curves and instead ones that are closer to the shape of your head. Once this is done the strips need to be attached together, which will be done by riveting. First holes need to be put in, this can be done with either a punch or a drill. Using a punch is easier when holes are near the edge but for some holes later in the build using a punch will not be possible so a drill will be necessary anyway. To rivet the pieces together I used nails. Placing them through the holes with the head on the inside then cutting them down leaving a small amount protruding and peening that down with a hammer against a hard surface.
Once the frame is together I then used that to create the pattern for the plates that fill the gaps. To do that I the rolled the frame on a piece of card, tracing the line given by the inside of one of the gaps. Then I expanded that shape by ~2 cm in each direction to give the overlap that is needed to rivet the pieces together. I did this for each of the spaces to produce a specific pattern to fit each part of the frame.
At this point is where we finally get to use the dishing form we made earlier. Once I cut out and prepared each part as I detailed previously I then started dishing each one. Dishing is a fairly slow process (especially if you are doing it without heat), requiring many passes to create a significant amount of depth. It is done by starting in the middle of the piece and working out to the edges in circles. I found it best to be striking with the hammer in the same place towards the edge of the form nearest to me and turning the piece around to move where I was hitting. Each hammer blow doesn’t need to be particularly hard, just slowly work around the piece and then start another pass. As metal is worked it becomes ‘work hardened’. The stress you are applying to it causes its internal structure to change and make it harder which means it will be more difficult to work with. If you are able to then it is best to anneal the piece when it starts to go too hard, which involves heating it up and then letting it cool to return it to its original hardness. I managed to get away without annealing anything so this should be achievable without but it would be easier if you are able to do so. Once the piece is starting to get close to the final shape try and fit it into place between passes to see what bits need more work to get it to the correct shape.
Once I had made all the plates it was time to rivet them into place, which I did by the same method described earlier. For the first plate all the holes can all be made through both the frame and the plate simultaneously using a punch. For some of the later plates it isn’t possible to reach with the punch so A drill has to be used instead. I found it was easier to punch the holes into the frame first before putting in the plate and then, once the plate has been fixed in place along the bottom, to drill through using the holes in the frame as a guide.
For the final parts (the nose and cheek guards) much the same process is followed. The pattern can mostly just be designed arbitrarily as it isn’t particularly important how these parts fit together. The only real difference is for the nasal. If you wan’t to put a crease down the middle then use something like a blunted chisel or an old axe head and hammer the piece over that then use something hard with a a sharp right angled edge to increase the angle if you wish.
The final stage is to give it a surface finish. I would recommend painting the inside as it will provide good long term rust protection. For the outside you could polish it, oil black it or paint, which was done historically more than we think partly due to over zealous 19th century museum curators polishing away historical paintwork.
That concludes the building of the helmet. If you make one be sure to clean it regularly so as to prevent it from rusting, which is what I didn’t do with mine and it is currently is quite bad condition. Armour is definitely something I would like to come back to and I am working on some ideas for a second helmet, though that isn’t likely to see any work until next summer unfortunately.